IOS SDK Setup
This section provides instructions for integrating the Qulerts SDK into your application.
To integrate the Qulerts SDK into your application, follow these steps:
-
Download the SDK: Obtain the Qulerts SDK from the official github site or through a package manager.
- Github link: https://github.com/qulerts/QulertsIosSdk
- We support both Swift Package Manager and Cocoapods.
-
Integrate the SDK: Add the SDK to your project's dependencies. Ensure that the SDK is compatible with your development environment and programming language.
-
Initialize the SDK: Initialize the SDK with your Qulerts account credentials. This step is crucial for the SDK to communicate with the Qulerts platform.
-
Implement Push Notifications: Use the SDK to enable push notifications in your application. This allows you to send timely messages to your users.
-
Test the Integration: Before deploying your application, test the SDK integration to ensure that push notifications are delivered successfully.
-
Deploy Your Application: Once you have verified the integration, deploy your application to make it available to your users.
-
Monitor and Optimize: Monitor the performance of your push notifications and optimize your campaigns for better engagement. Utilize custom tags to personalize and target your messaging more effectively.
-
Update the SDK: Regularly update the SDK to access new features and security patches.
For detailed instructions on integrating the Qulerts SDK into your application, refer to the steps below.
Requirement
- Qulerts SDK Key which can be acquired through the platform. iOS Push Certificate
- iOS Device (you need to test on a real device for notifications)
- A mac with Xcode 14+
- Qulerts Mobil SDK for iOS supports version iOS 10+.
Add IOS SDK with Swift Package Manager
Adding the Qulerts iOS SDK to your mobile iOS projects using Swift Package Manager is straightforward. Here are the steps:
-
Open your Xcode project: Launch Xcode and open your iOS project.
-
Navigate to Swift Package Manager: In Xcode, select your project in the project navigator. Then, select your target under the "Targets" section and go to the "Swift Packages" tab.
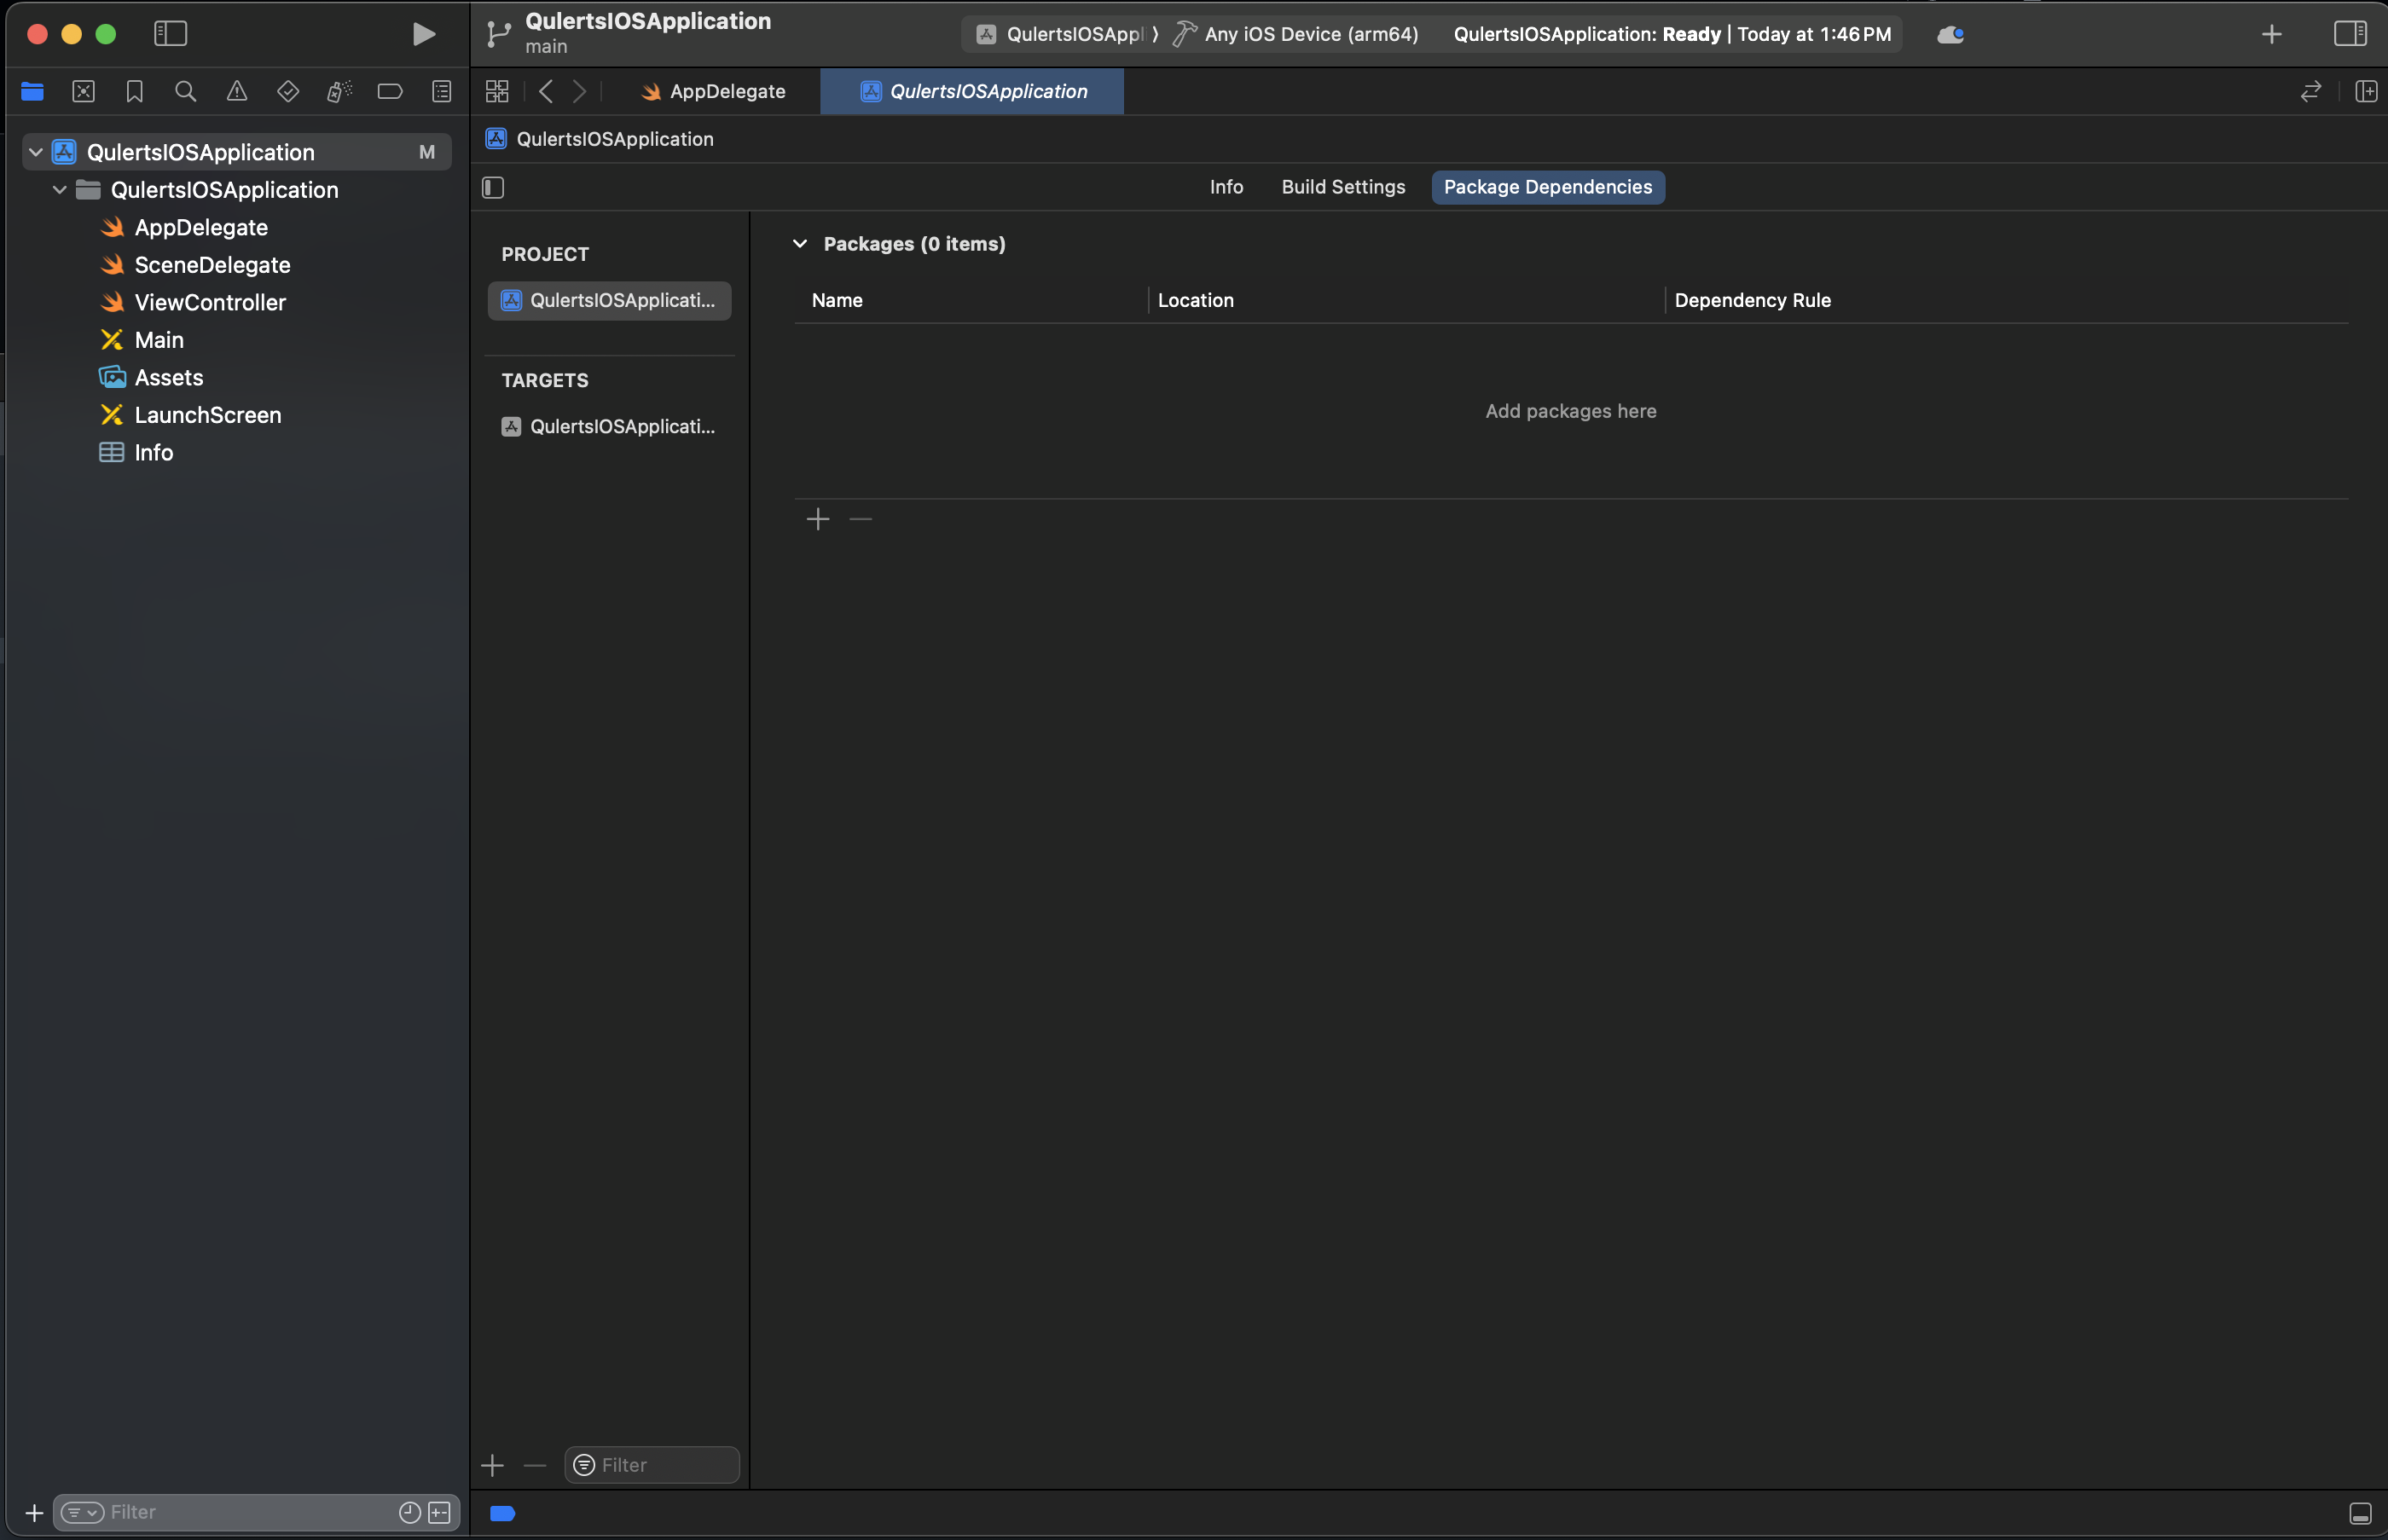
Add Package Dependency through Project Properties
- Add the Qulerts SDK package: Click the "+" button and paste the following URL into the search field:
https://github.com/qulerts/QulertsIosSdk.
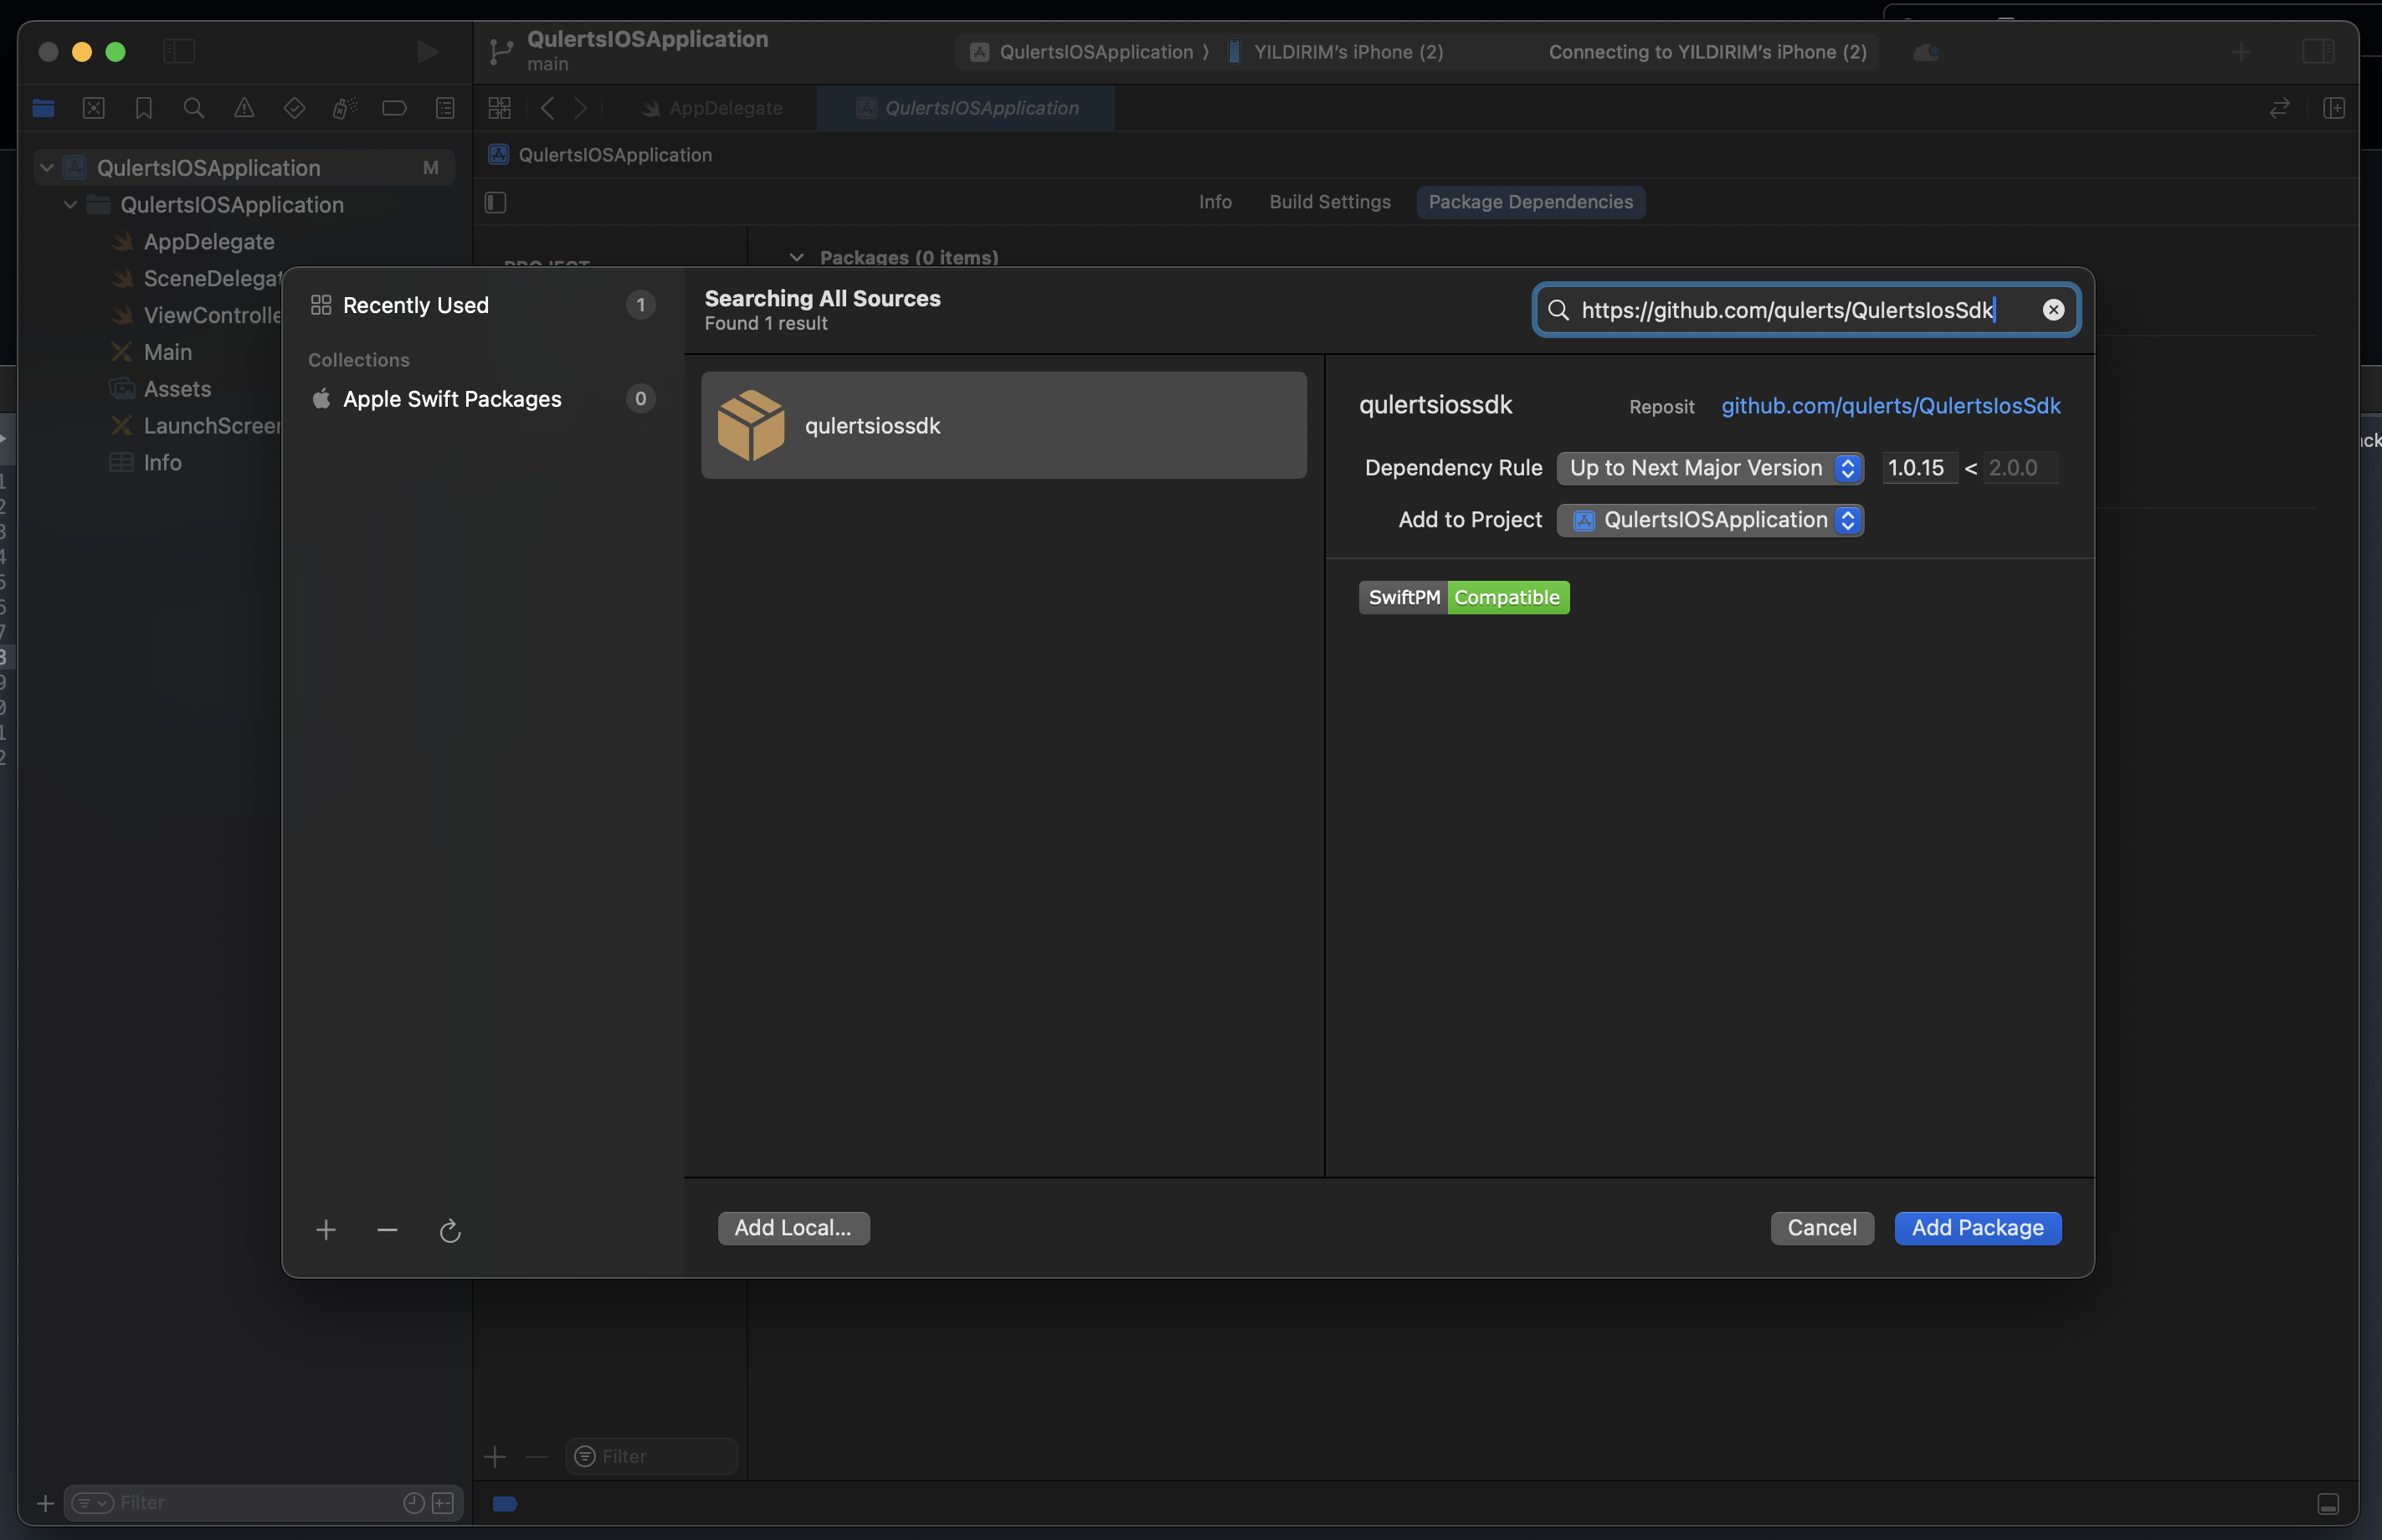
Add Qulerts SDK at Github
- Add the package: Click the "Add Package" button to add the Qulerts SDK to your project. Xcode will download and integrate the SDK into your project.
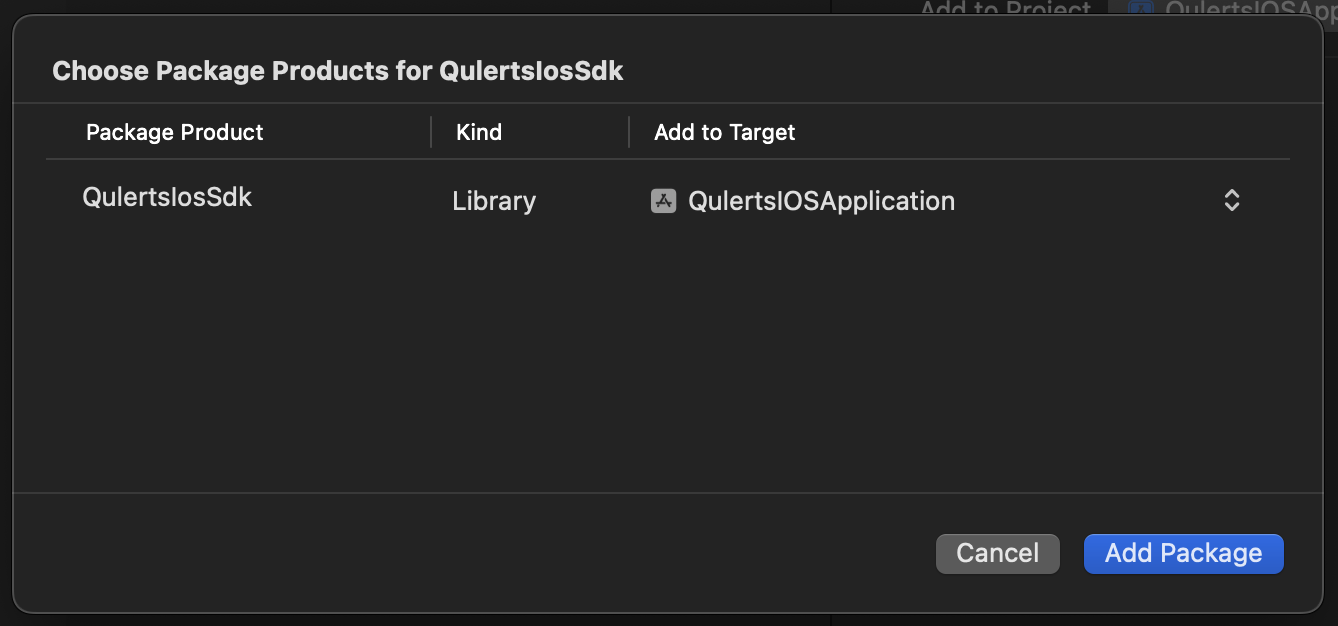
Click Add Package to add IOS SDK to your target application
- Specify the SDK version: Choose the version of the Qulerts SDK that you want to use. You can select "Up to Next Major Version" to get the latest major version, or specify a particular version if needed.
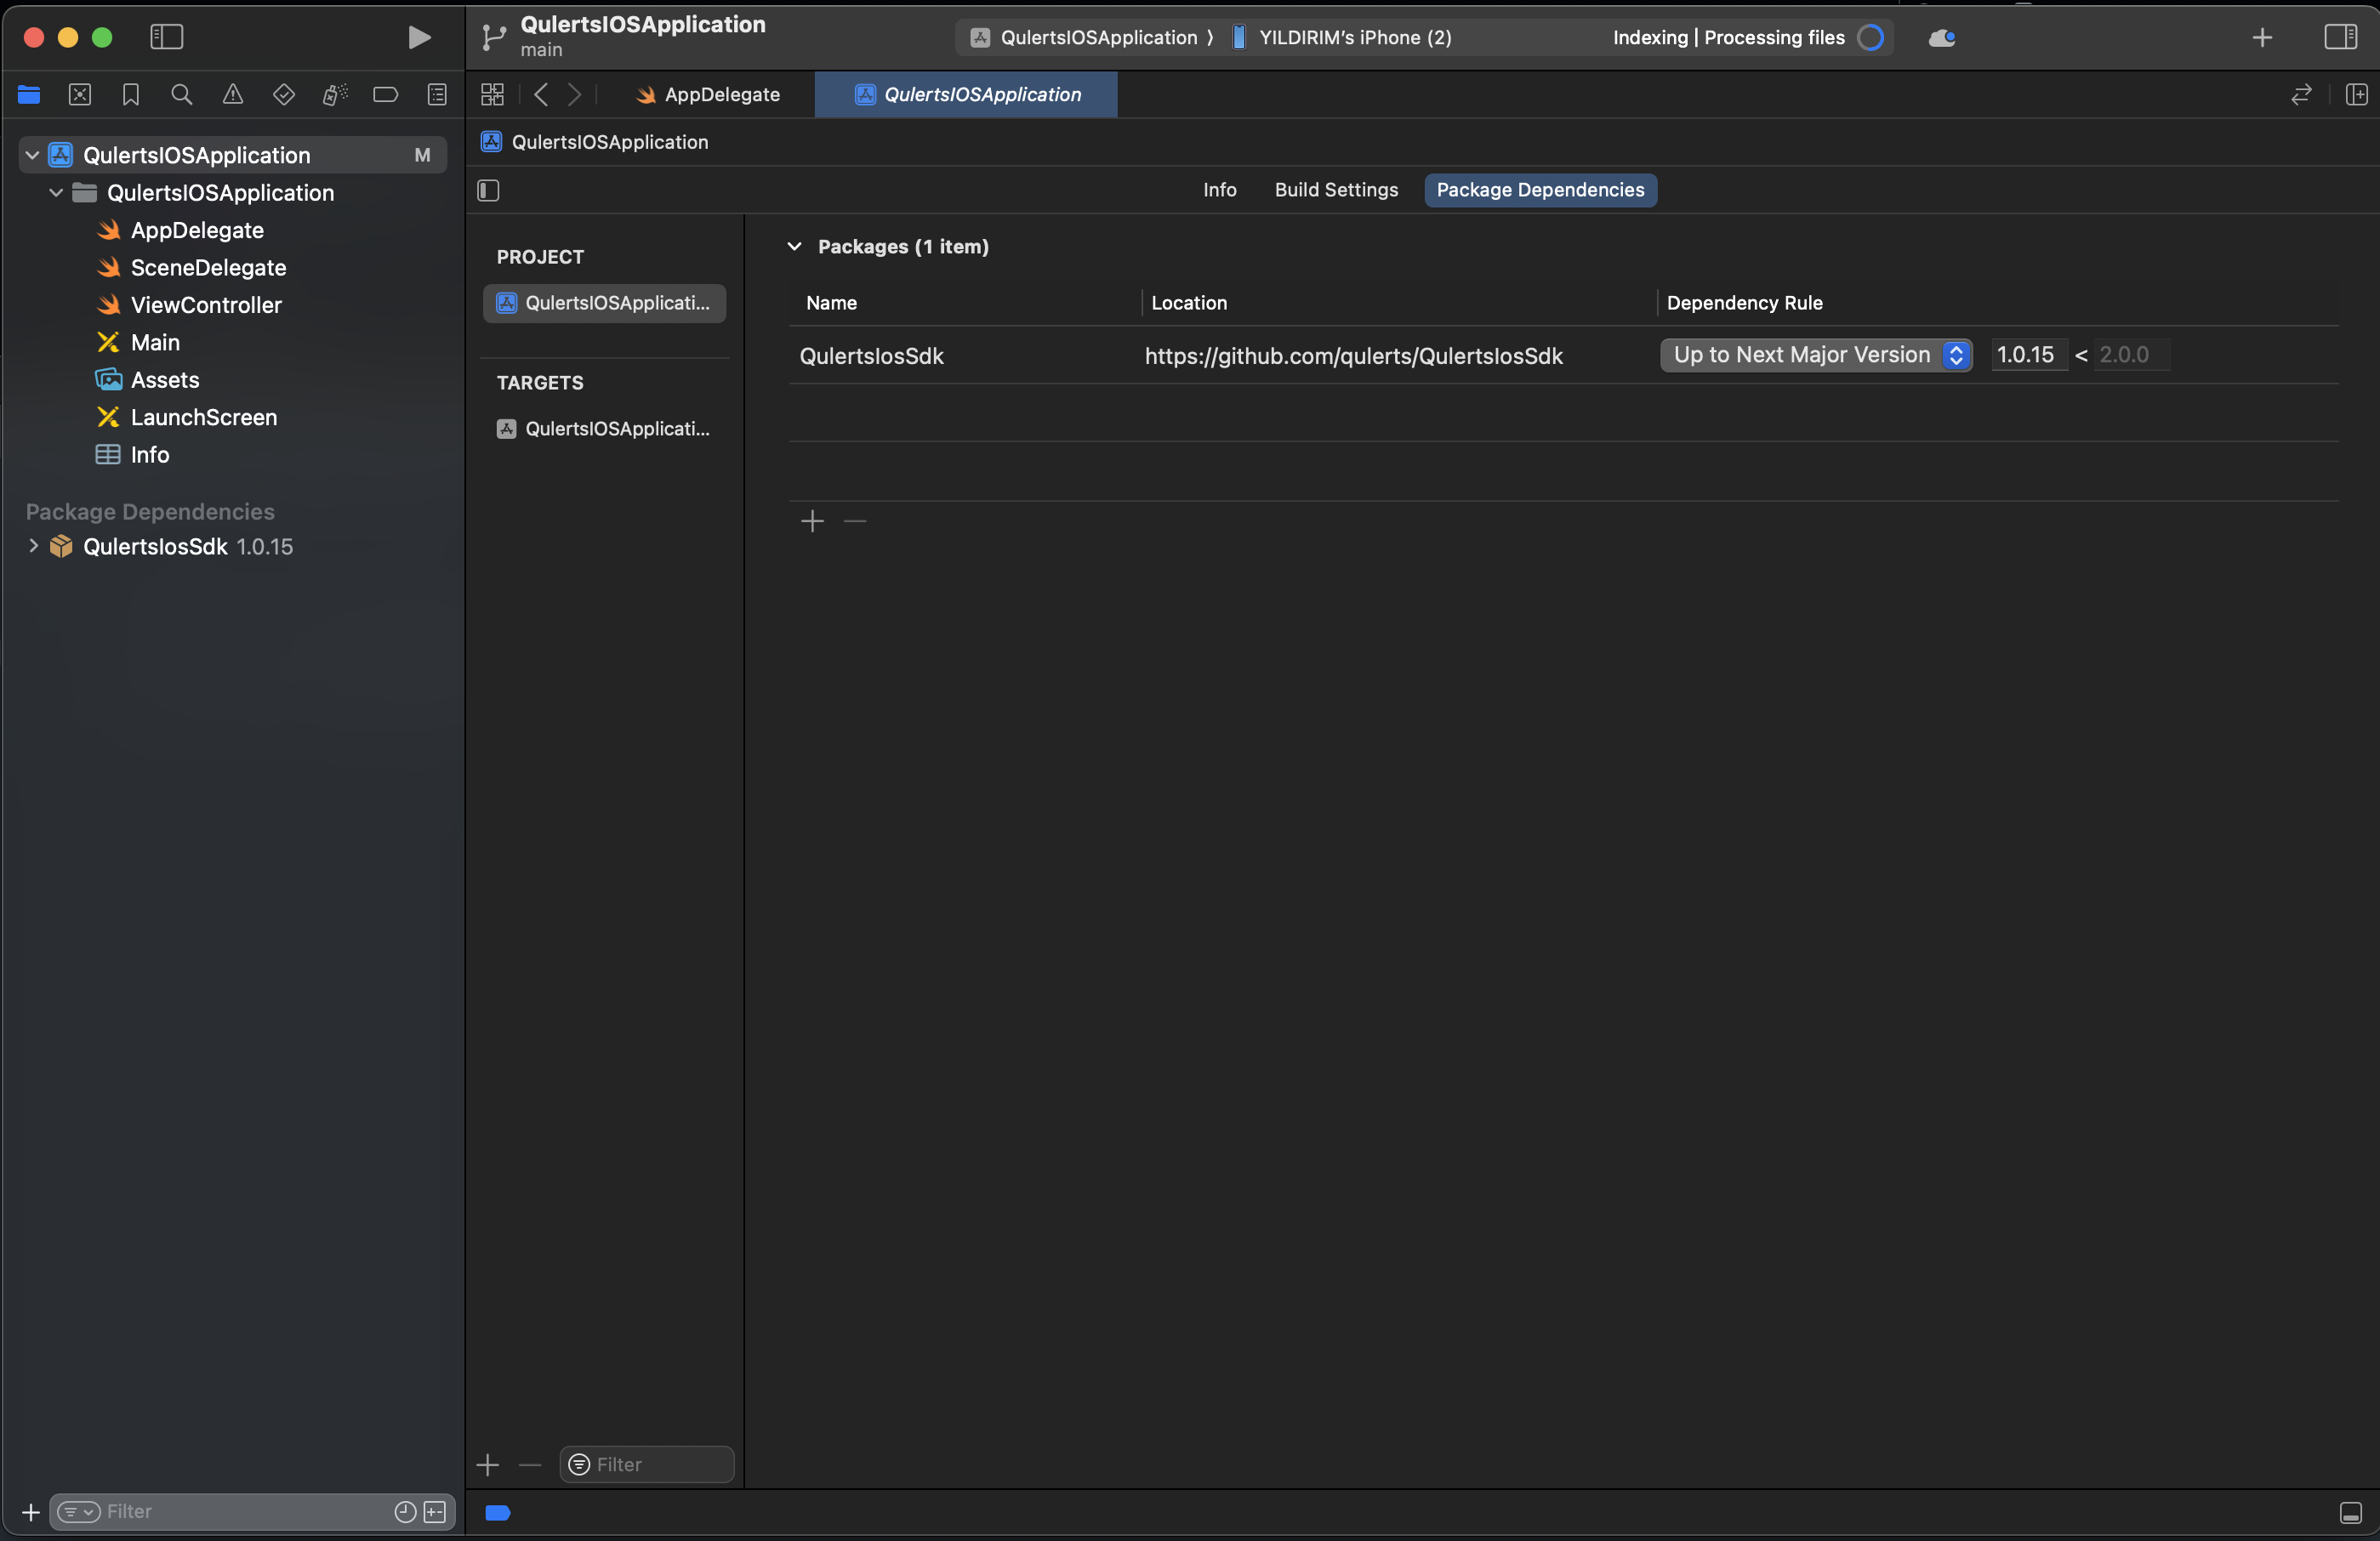
IOS SDK listed under Packages
After completing all these steps, you should see the QulertsIosSDK listed under the "Frameworks, Libraries, and Embedded Content" section in the General tab of your Xcode project settings. This indicates that the Qulerts SDK has been successfully added to your project and is ready to be used in your iOS app.
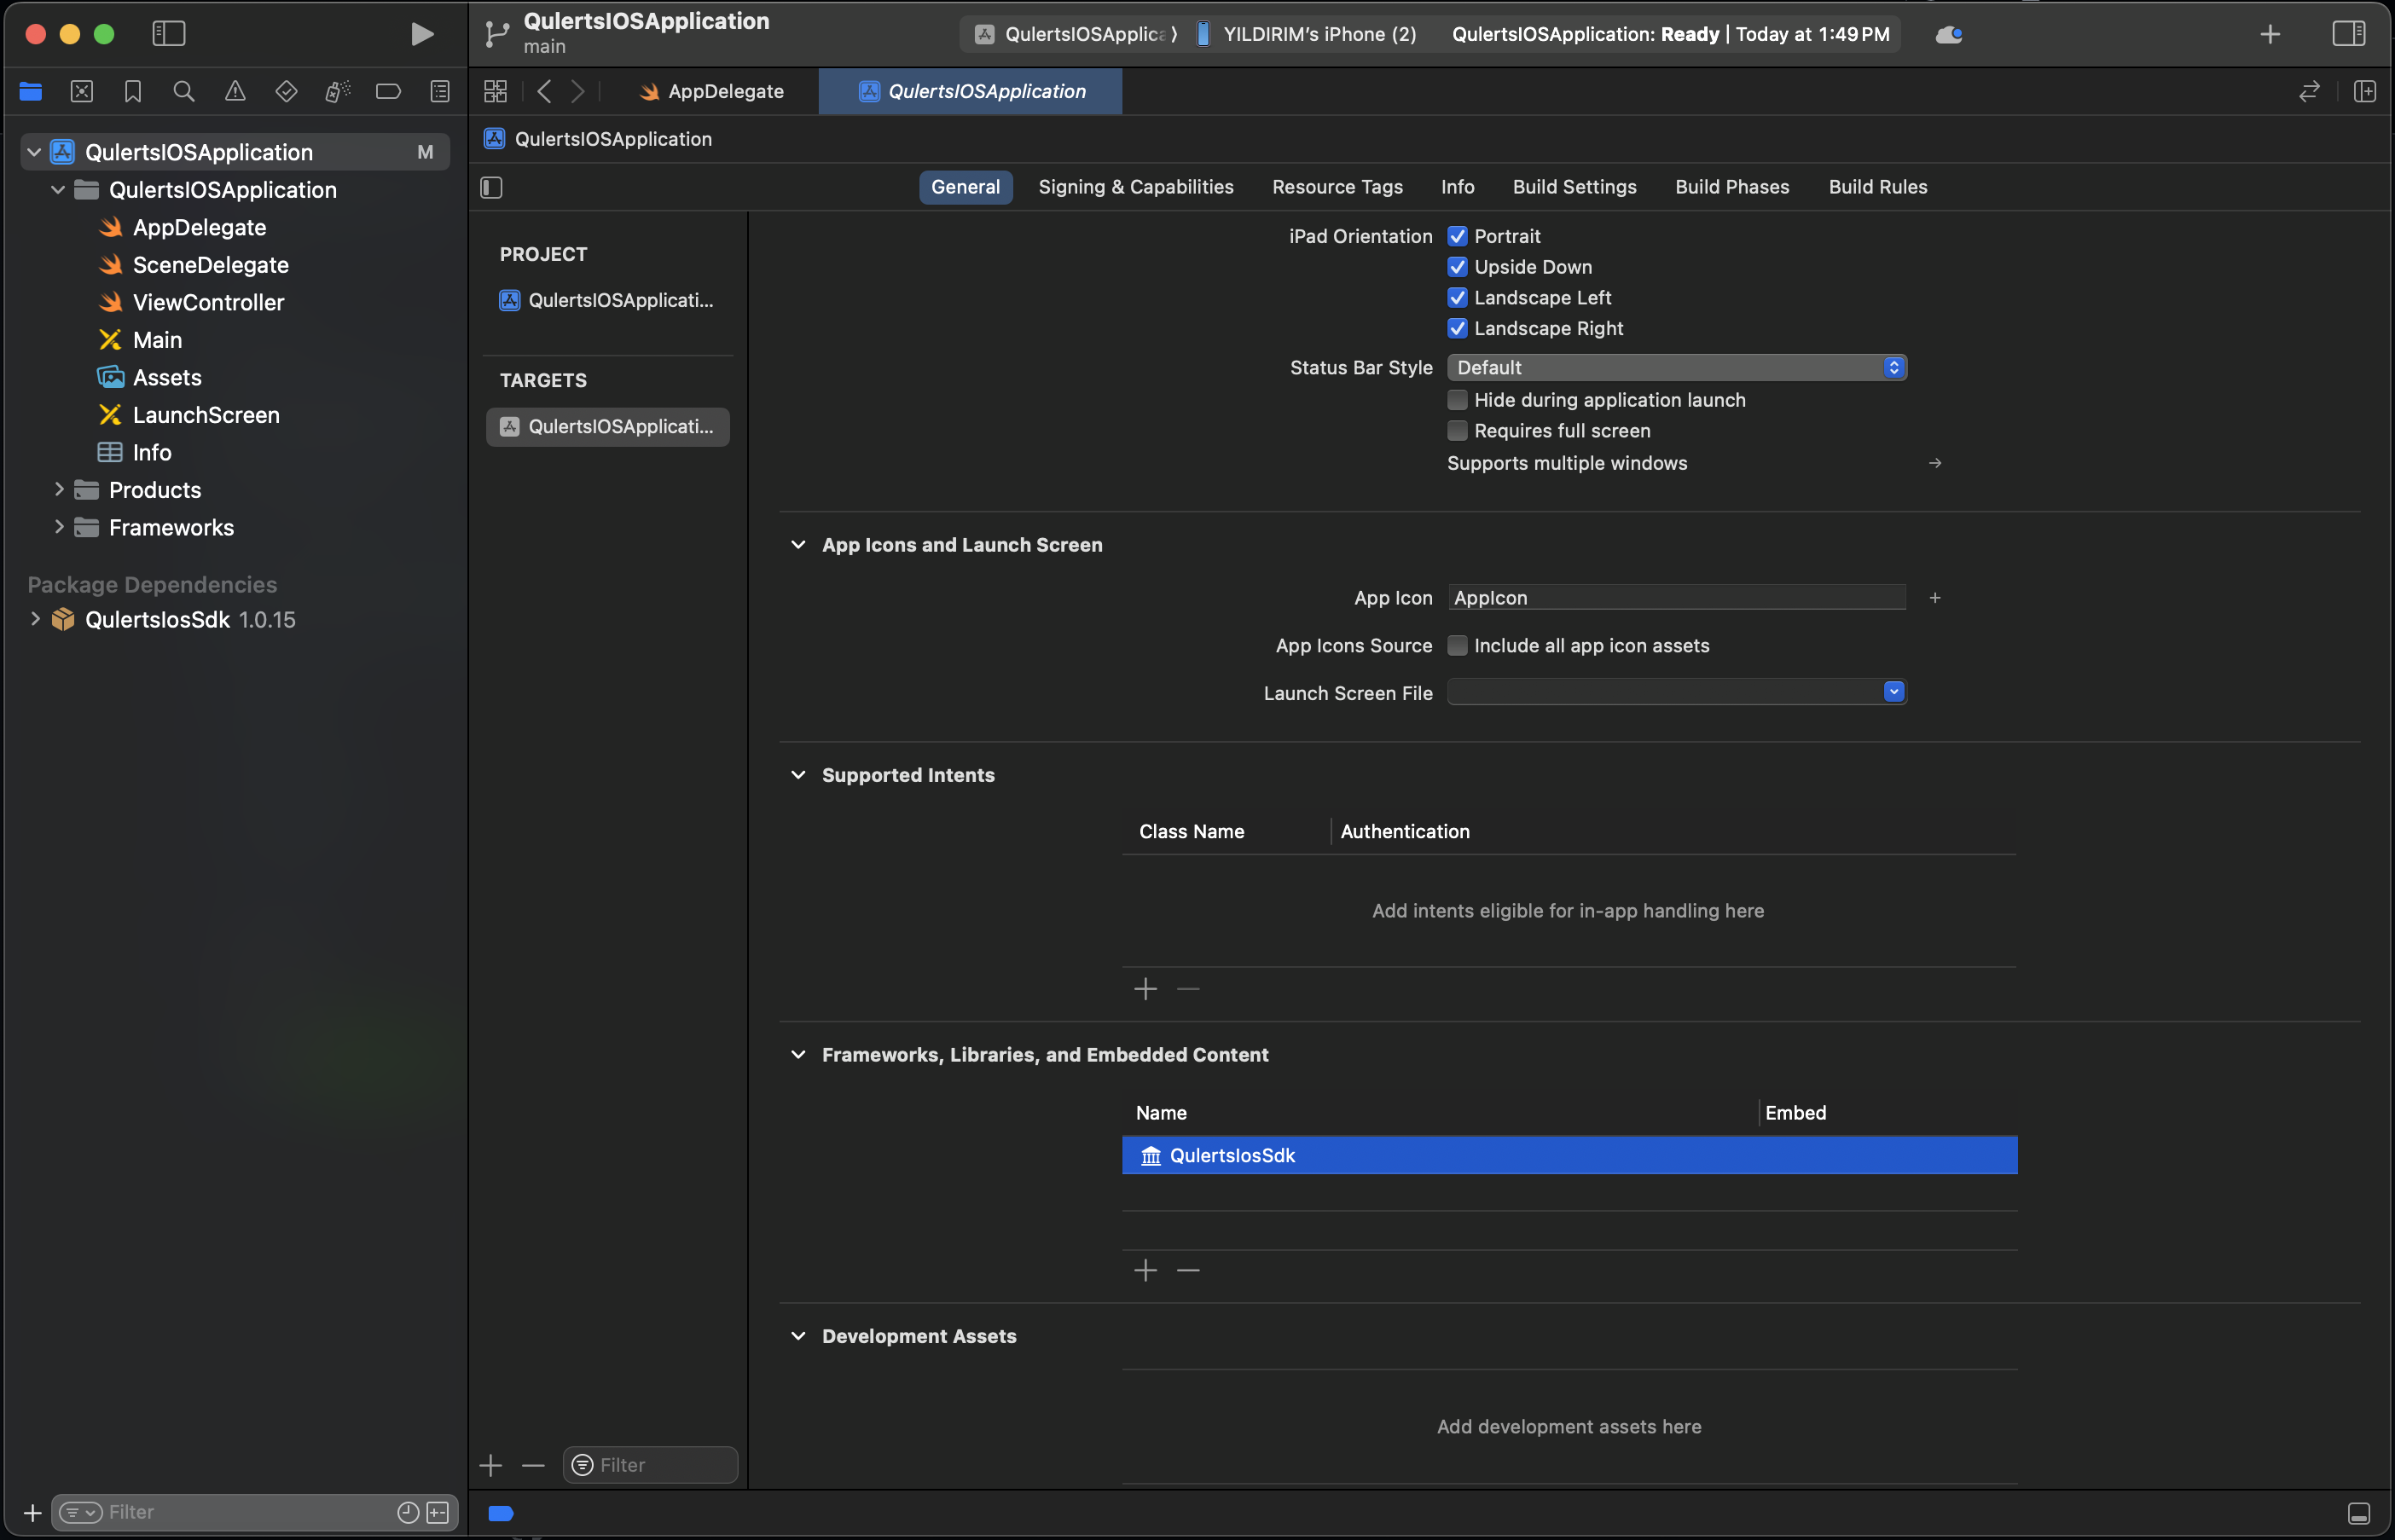
Your application is ready to initialize and implement Qulerts Mobile SDK.
Adding push notification extension with Swift Package Manager
To add the Qulerts PushExtensionManager with Swift Package Manager, follow these steps:
-
Open your Xcode project: Launch Xcode and open your iOS project.
-
Navigate to Swift Package Manager: In Xcode, select your project in the project navigator. Then, select your target under the "Targets" section and go to the "Swift Packages" tab.
-
Add the Qulerts PushExtensionManager package: Click the "+" button and enter the following URL:
https://github.com/qulerts/QulertsNotificationExtension.
Lets enable Notification Extension Service first in our application.
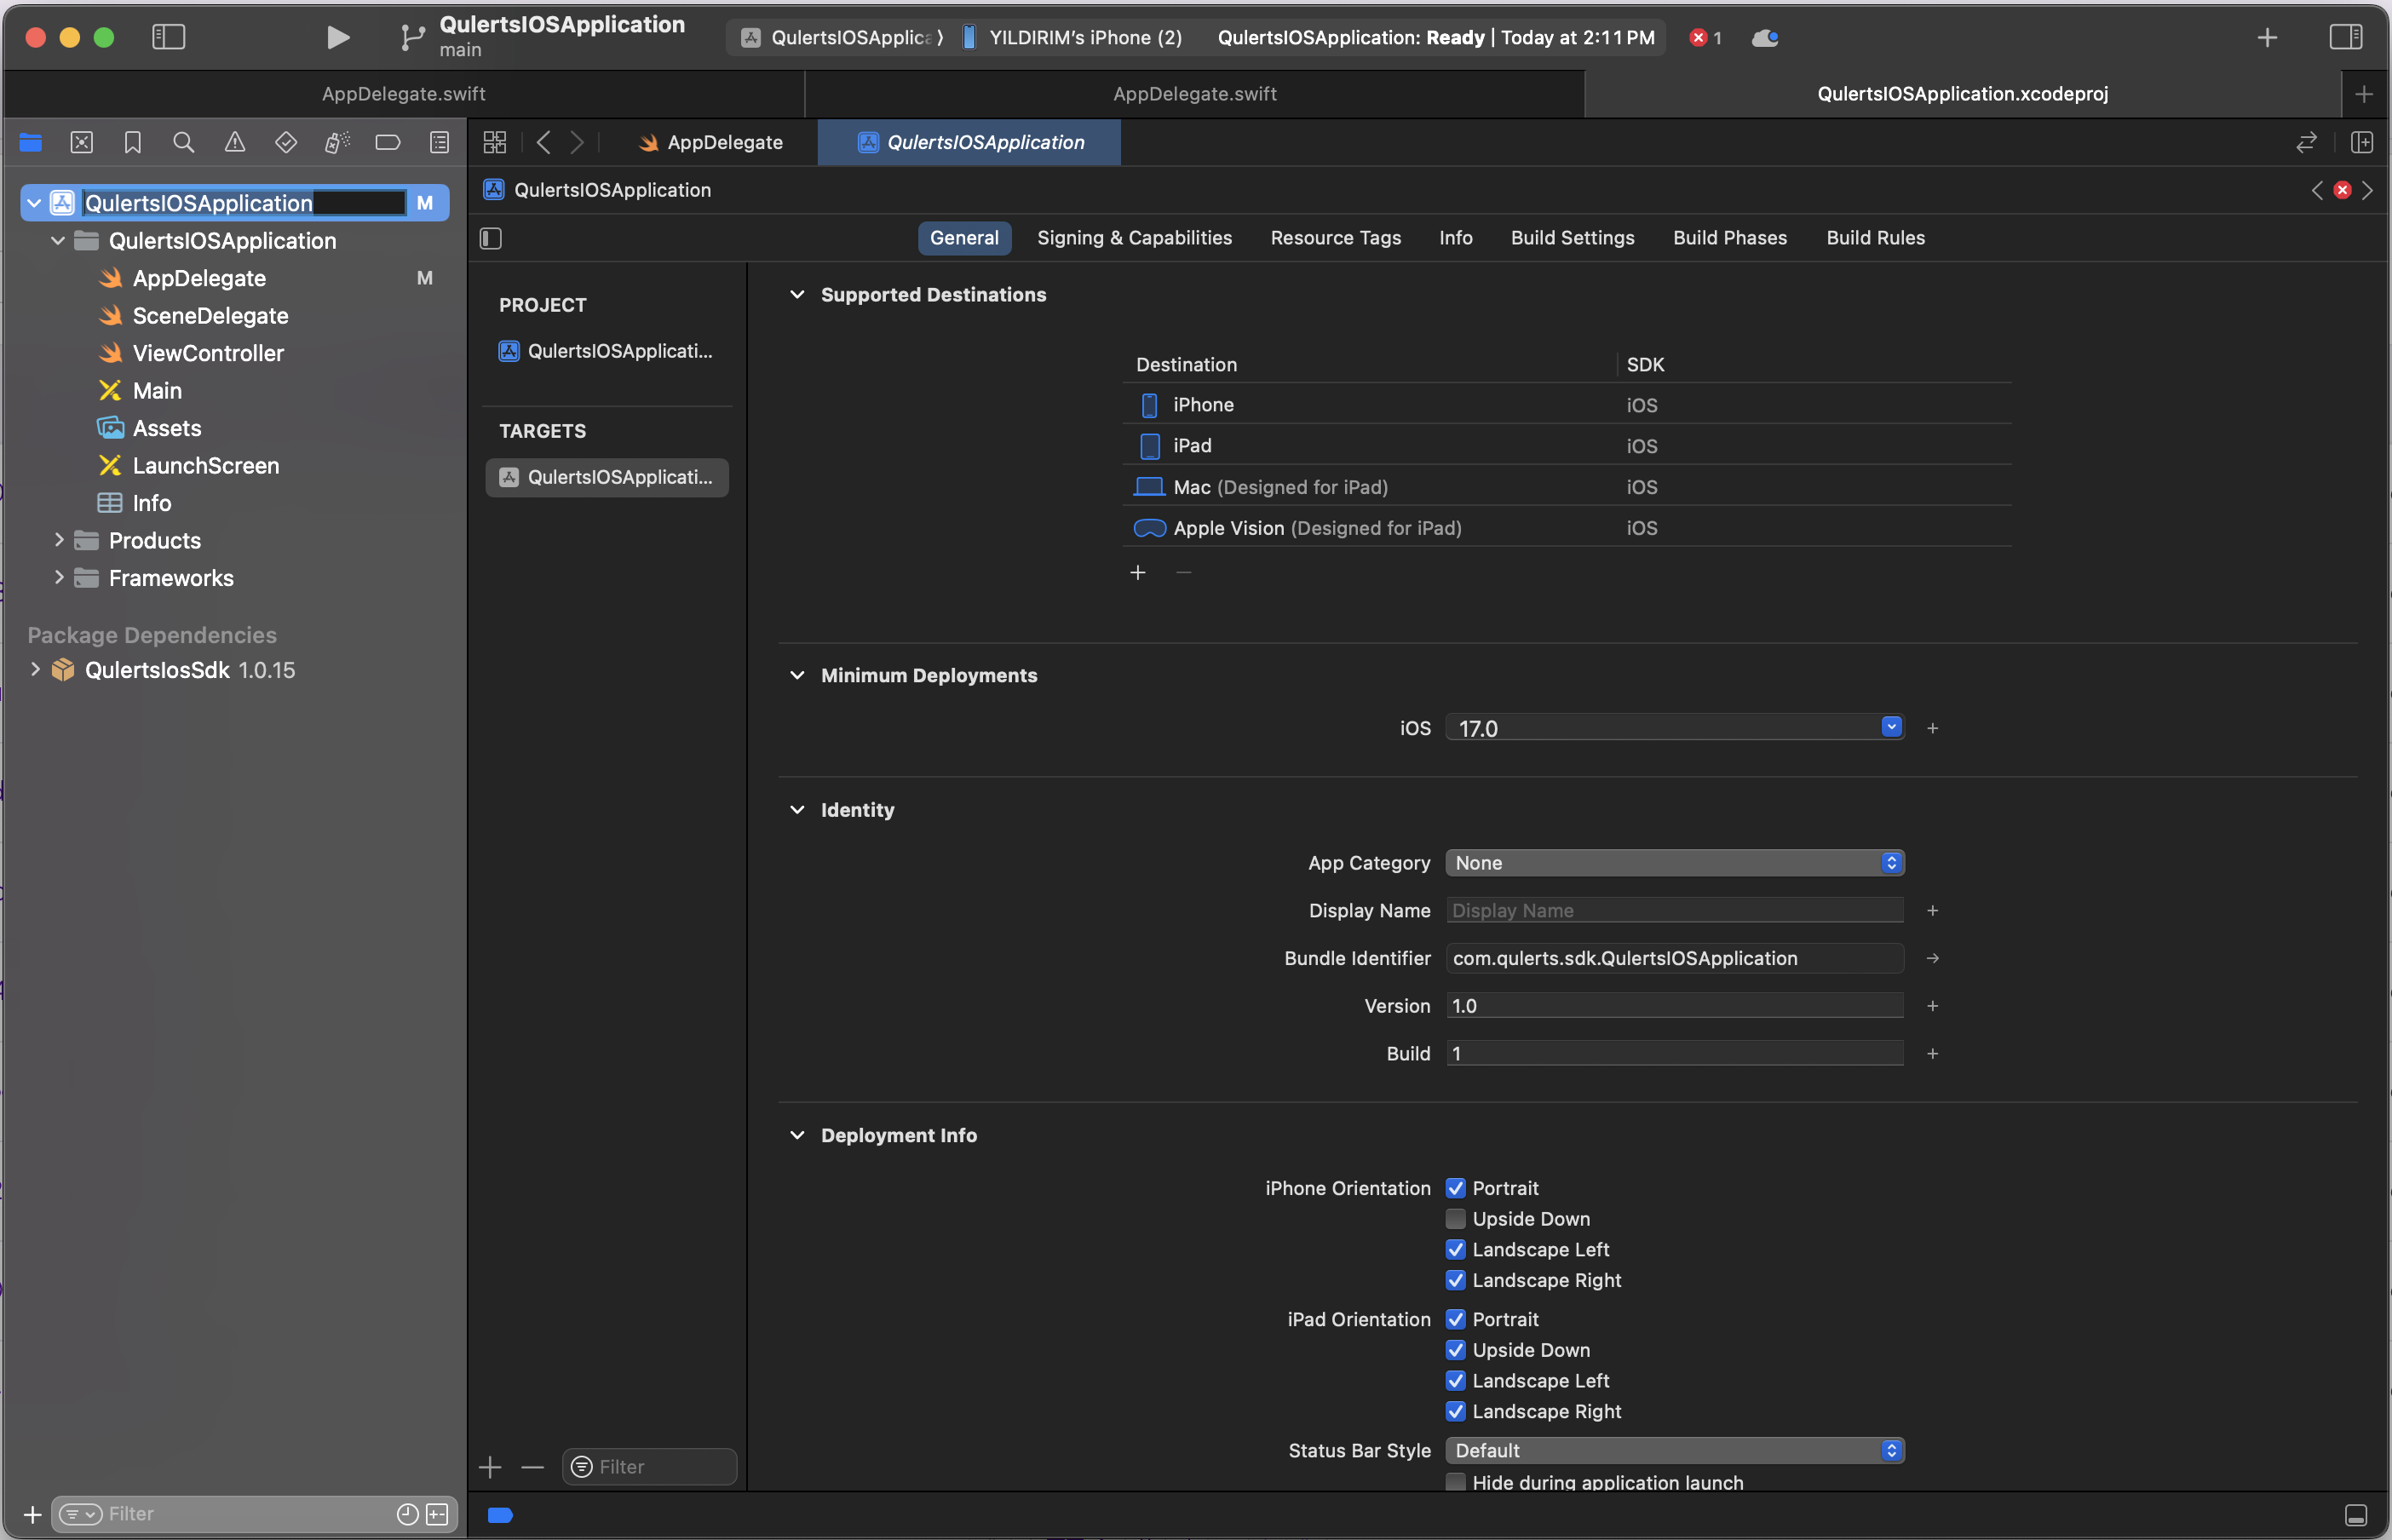
Click + under Targets window
Please write notification in Filter window below.
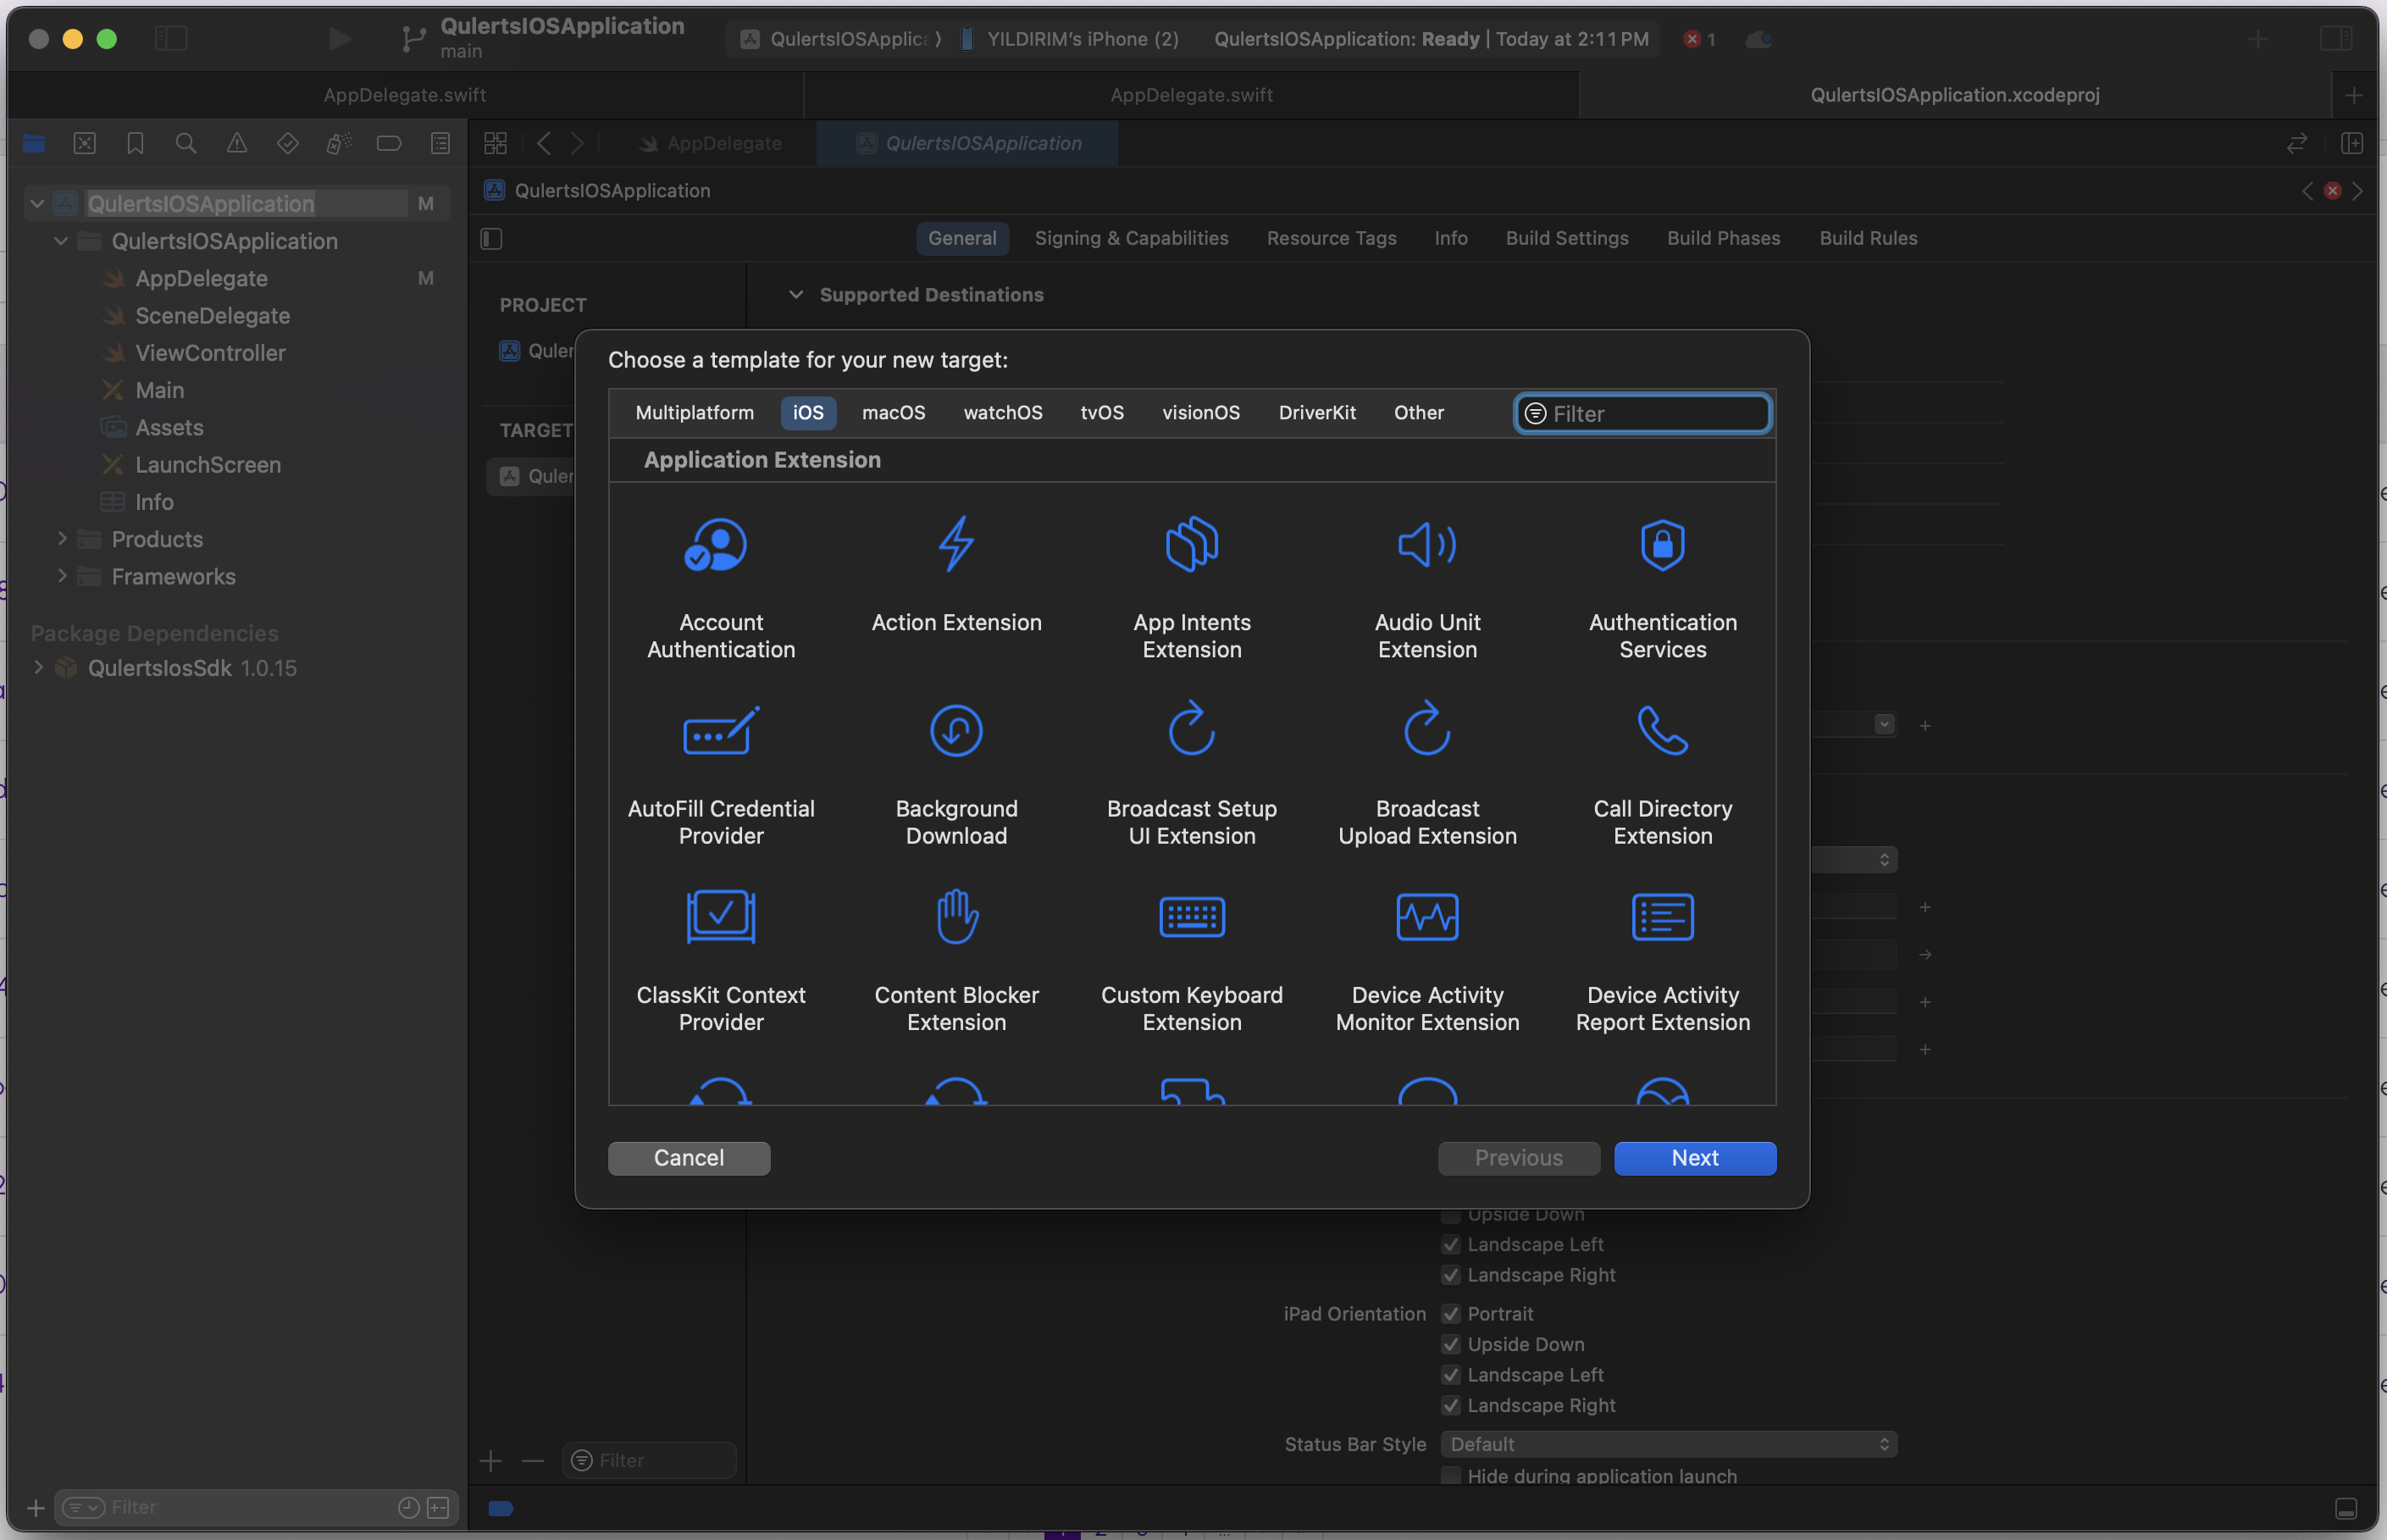
Filter with notification
Choose Notification Service Extension. Click Next.
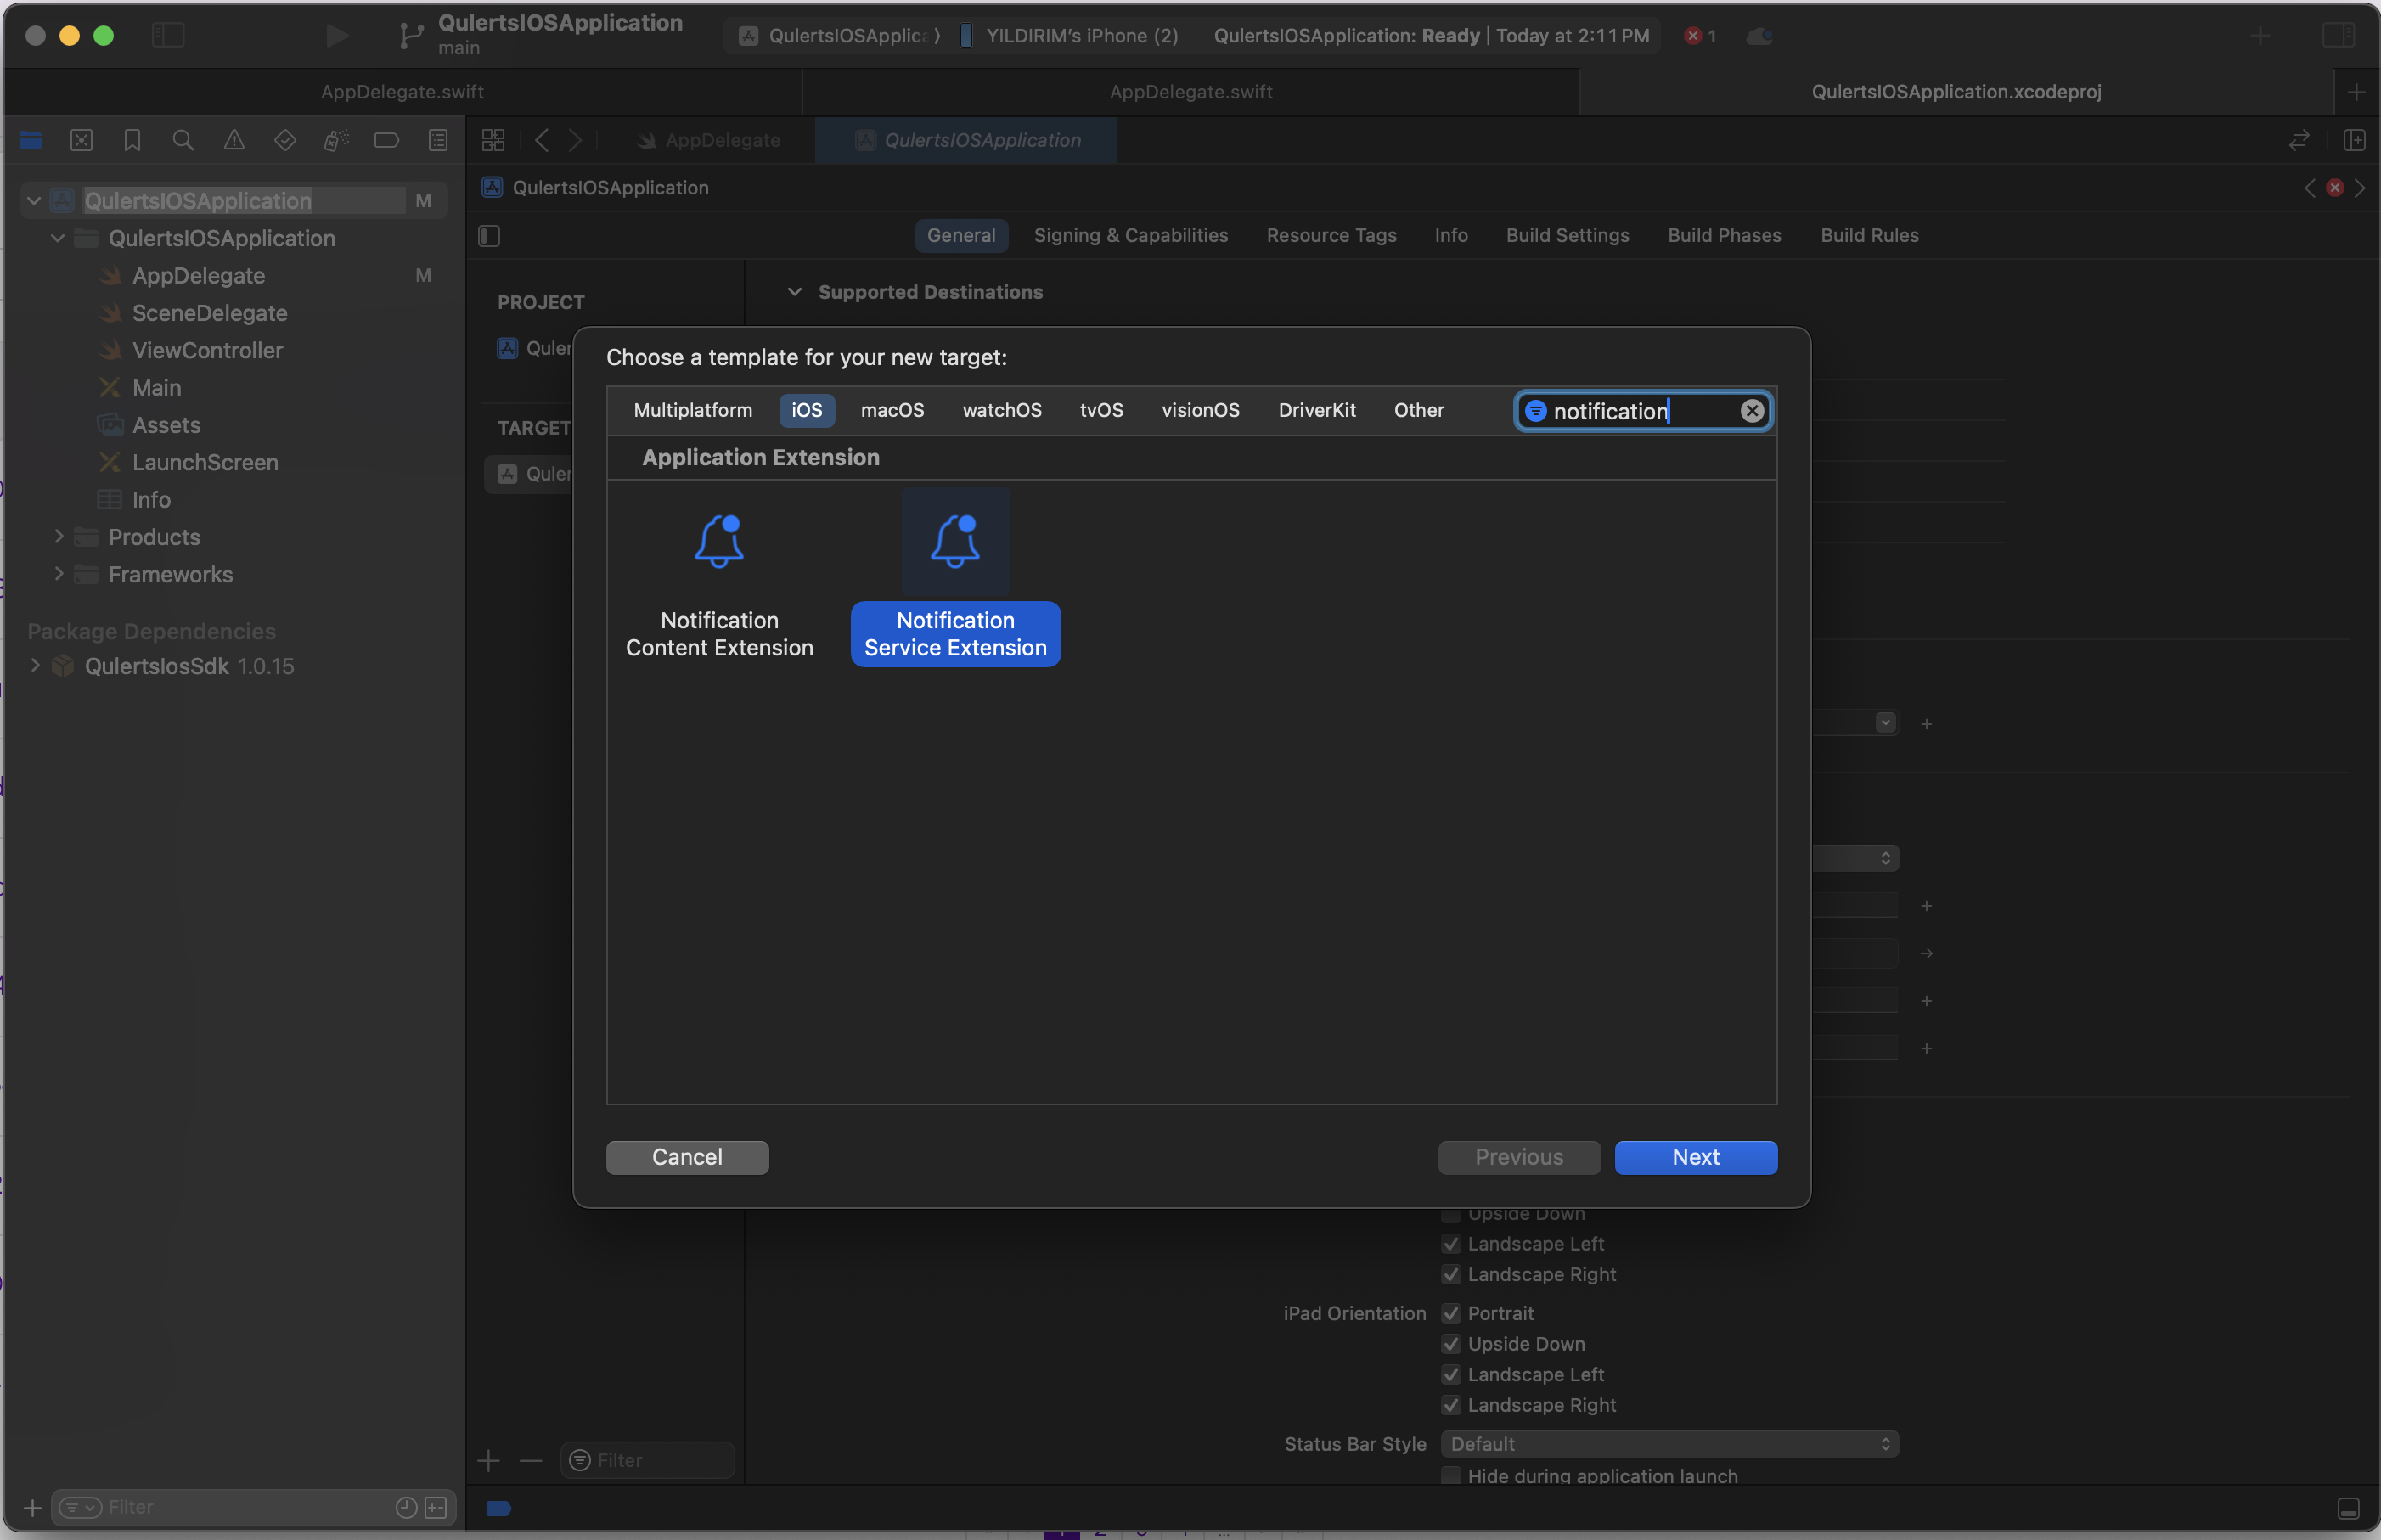
Select Notification Service Extension and Click Next
Hit Finish.
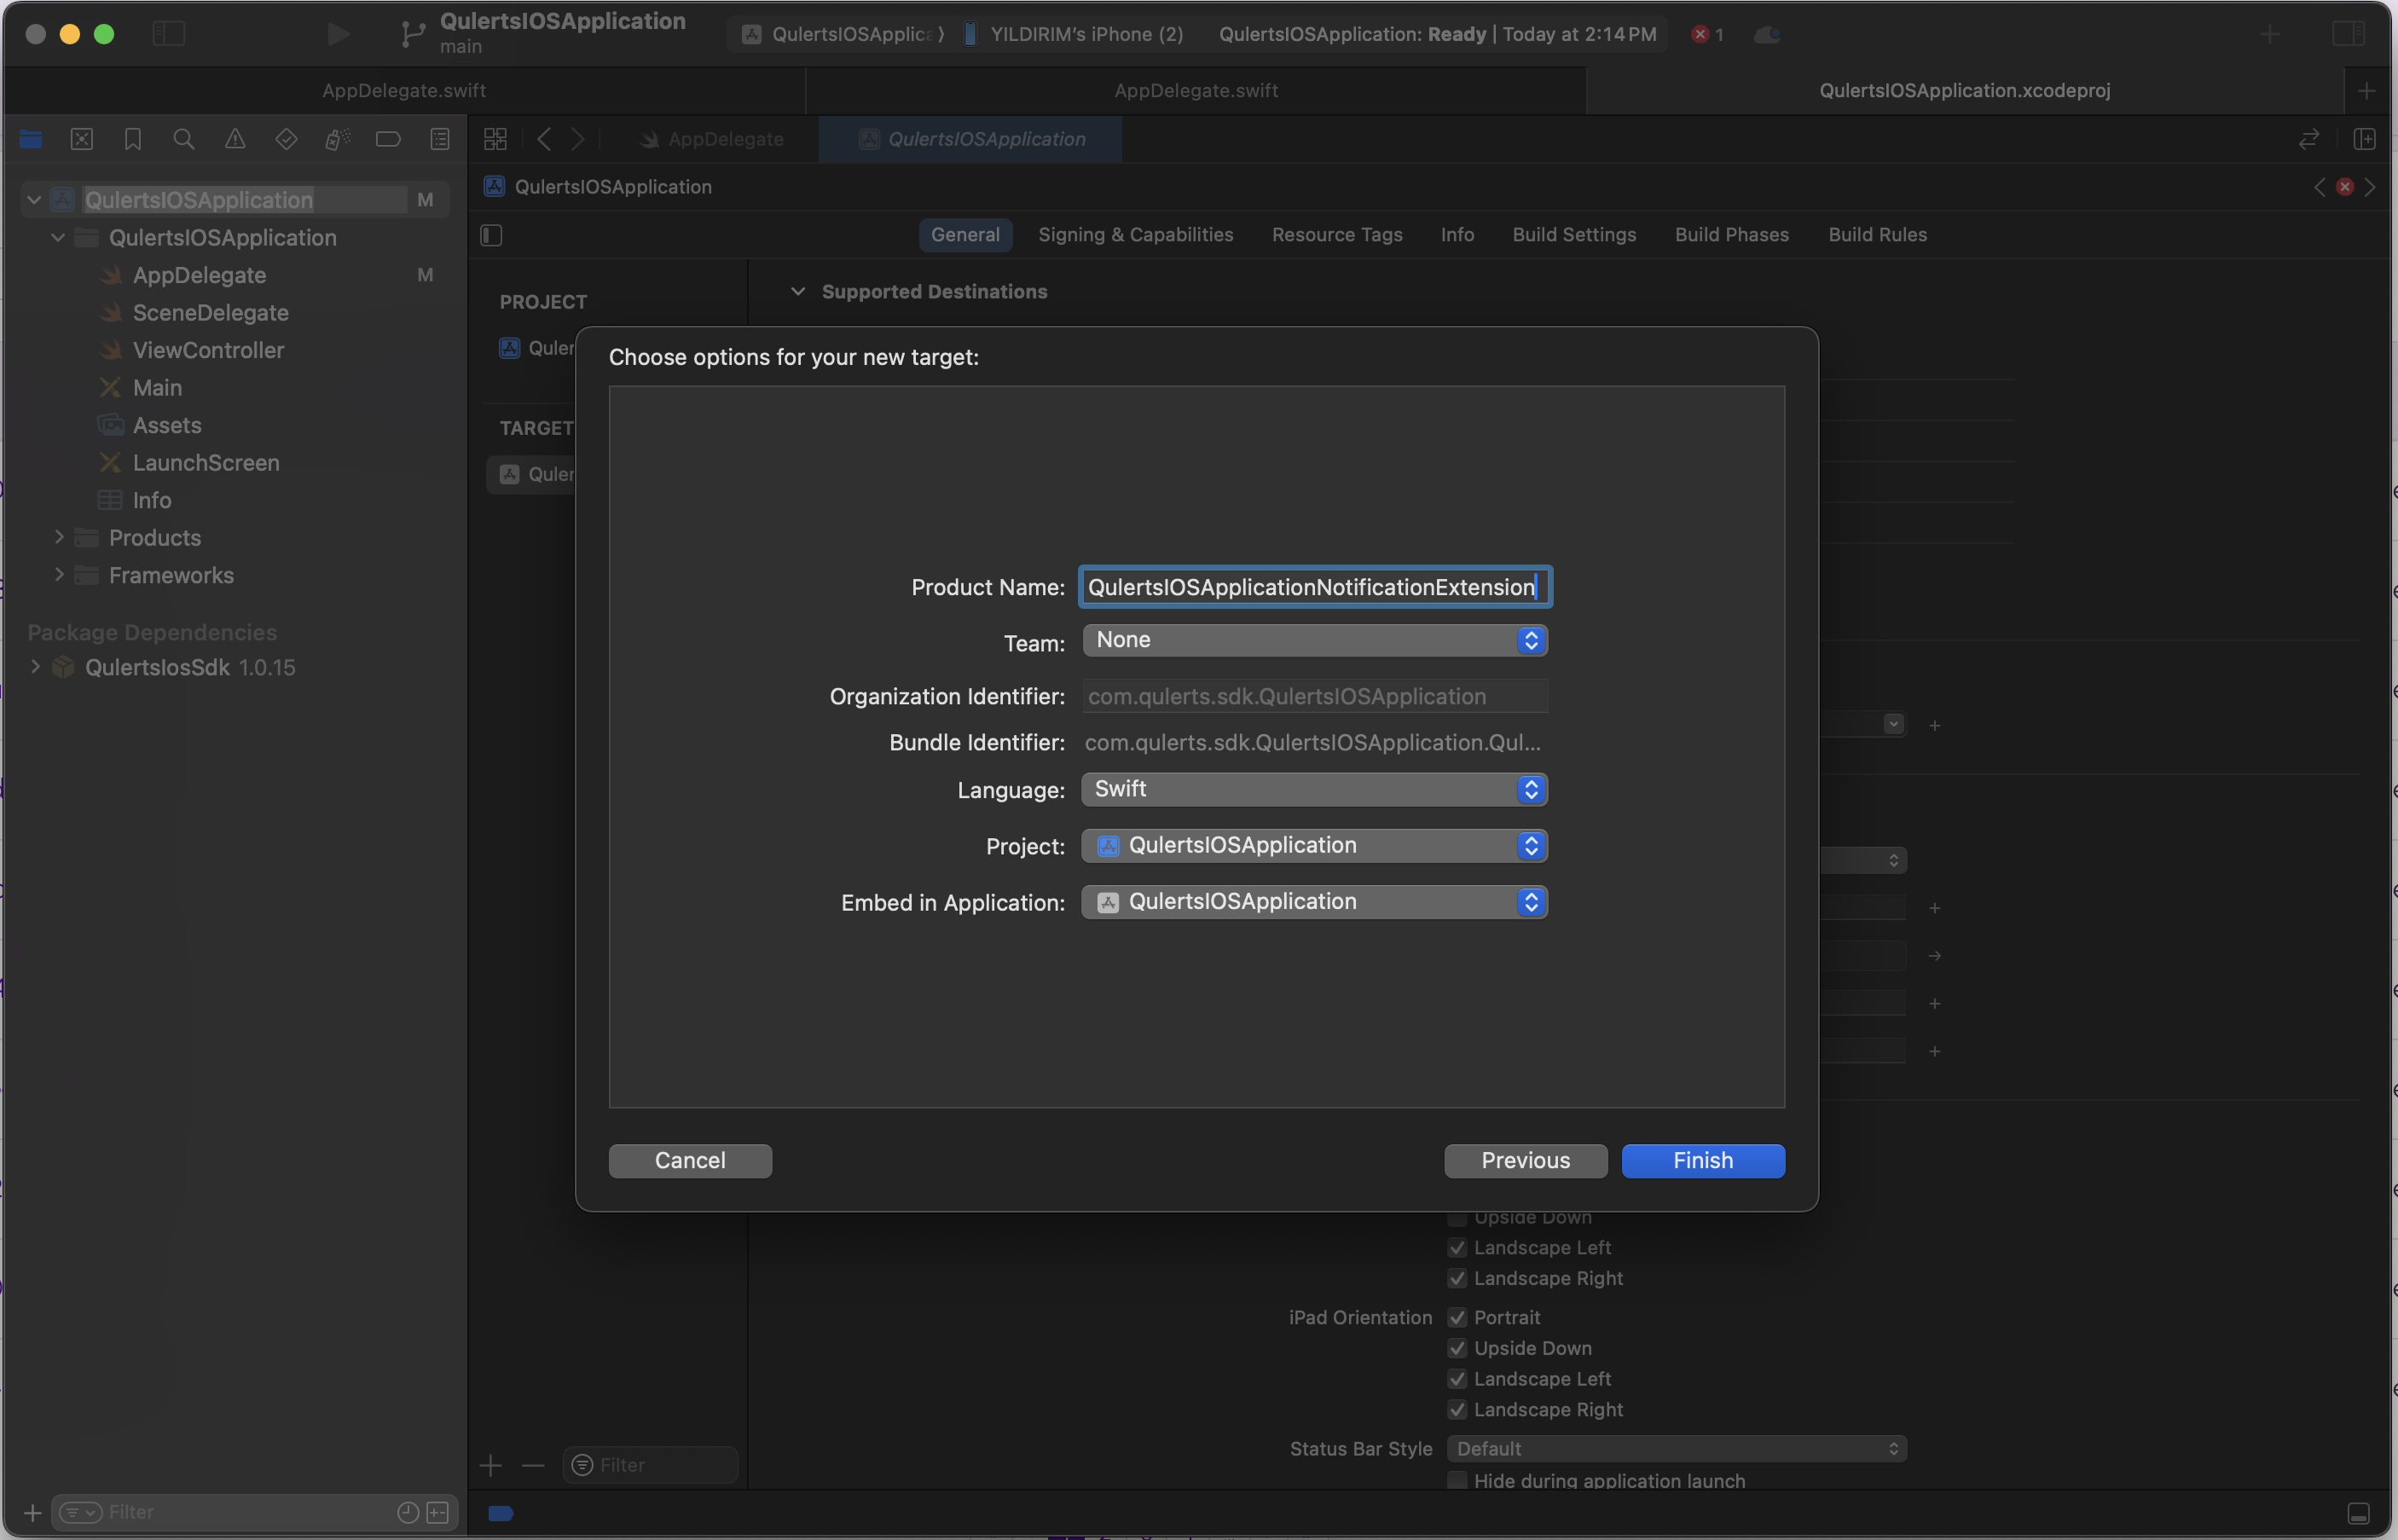
Hit Finish
Hit Activate.
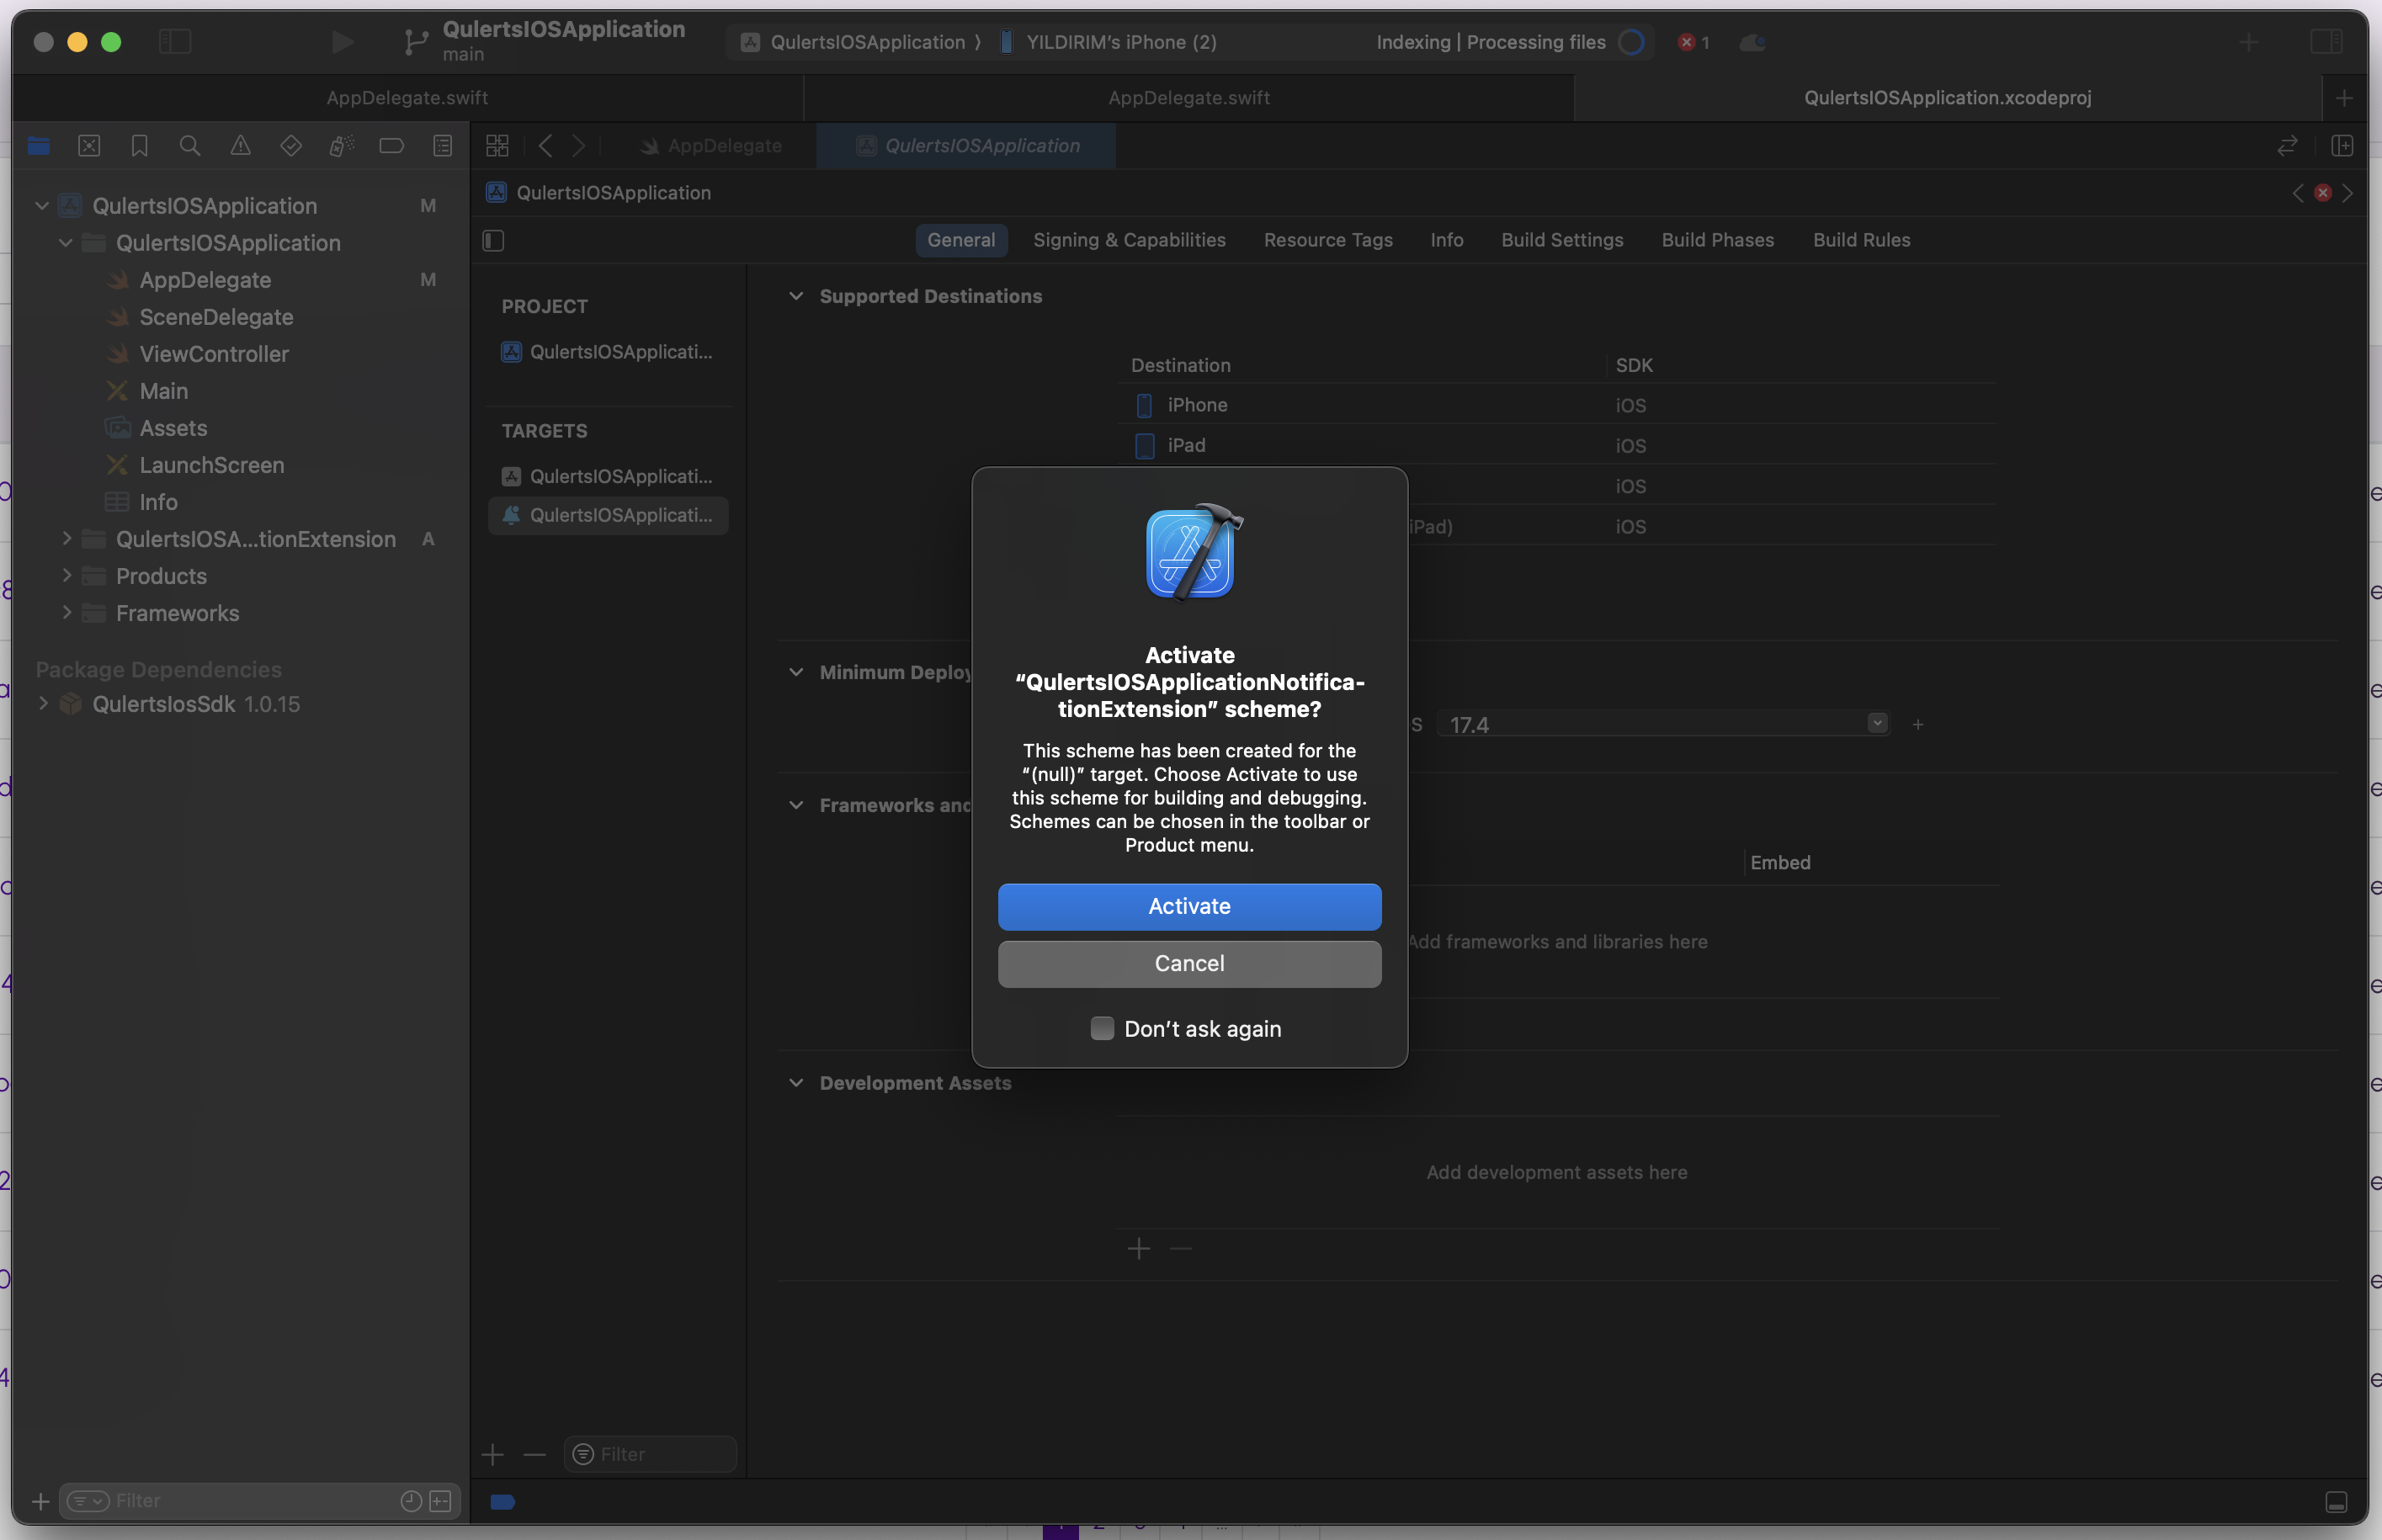
Hit Activate
Under "Targets" in your Xcode project, you should see a new notification extension added after integrating the PushExtensionManager. This extension is used to handle and manage push notifications received by your app. You can find it listed alongside your main app target and any other targets you have in your project.
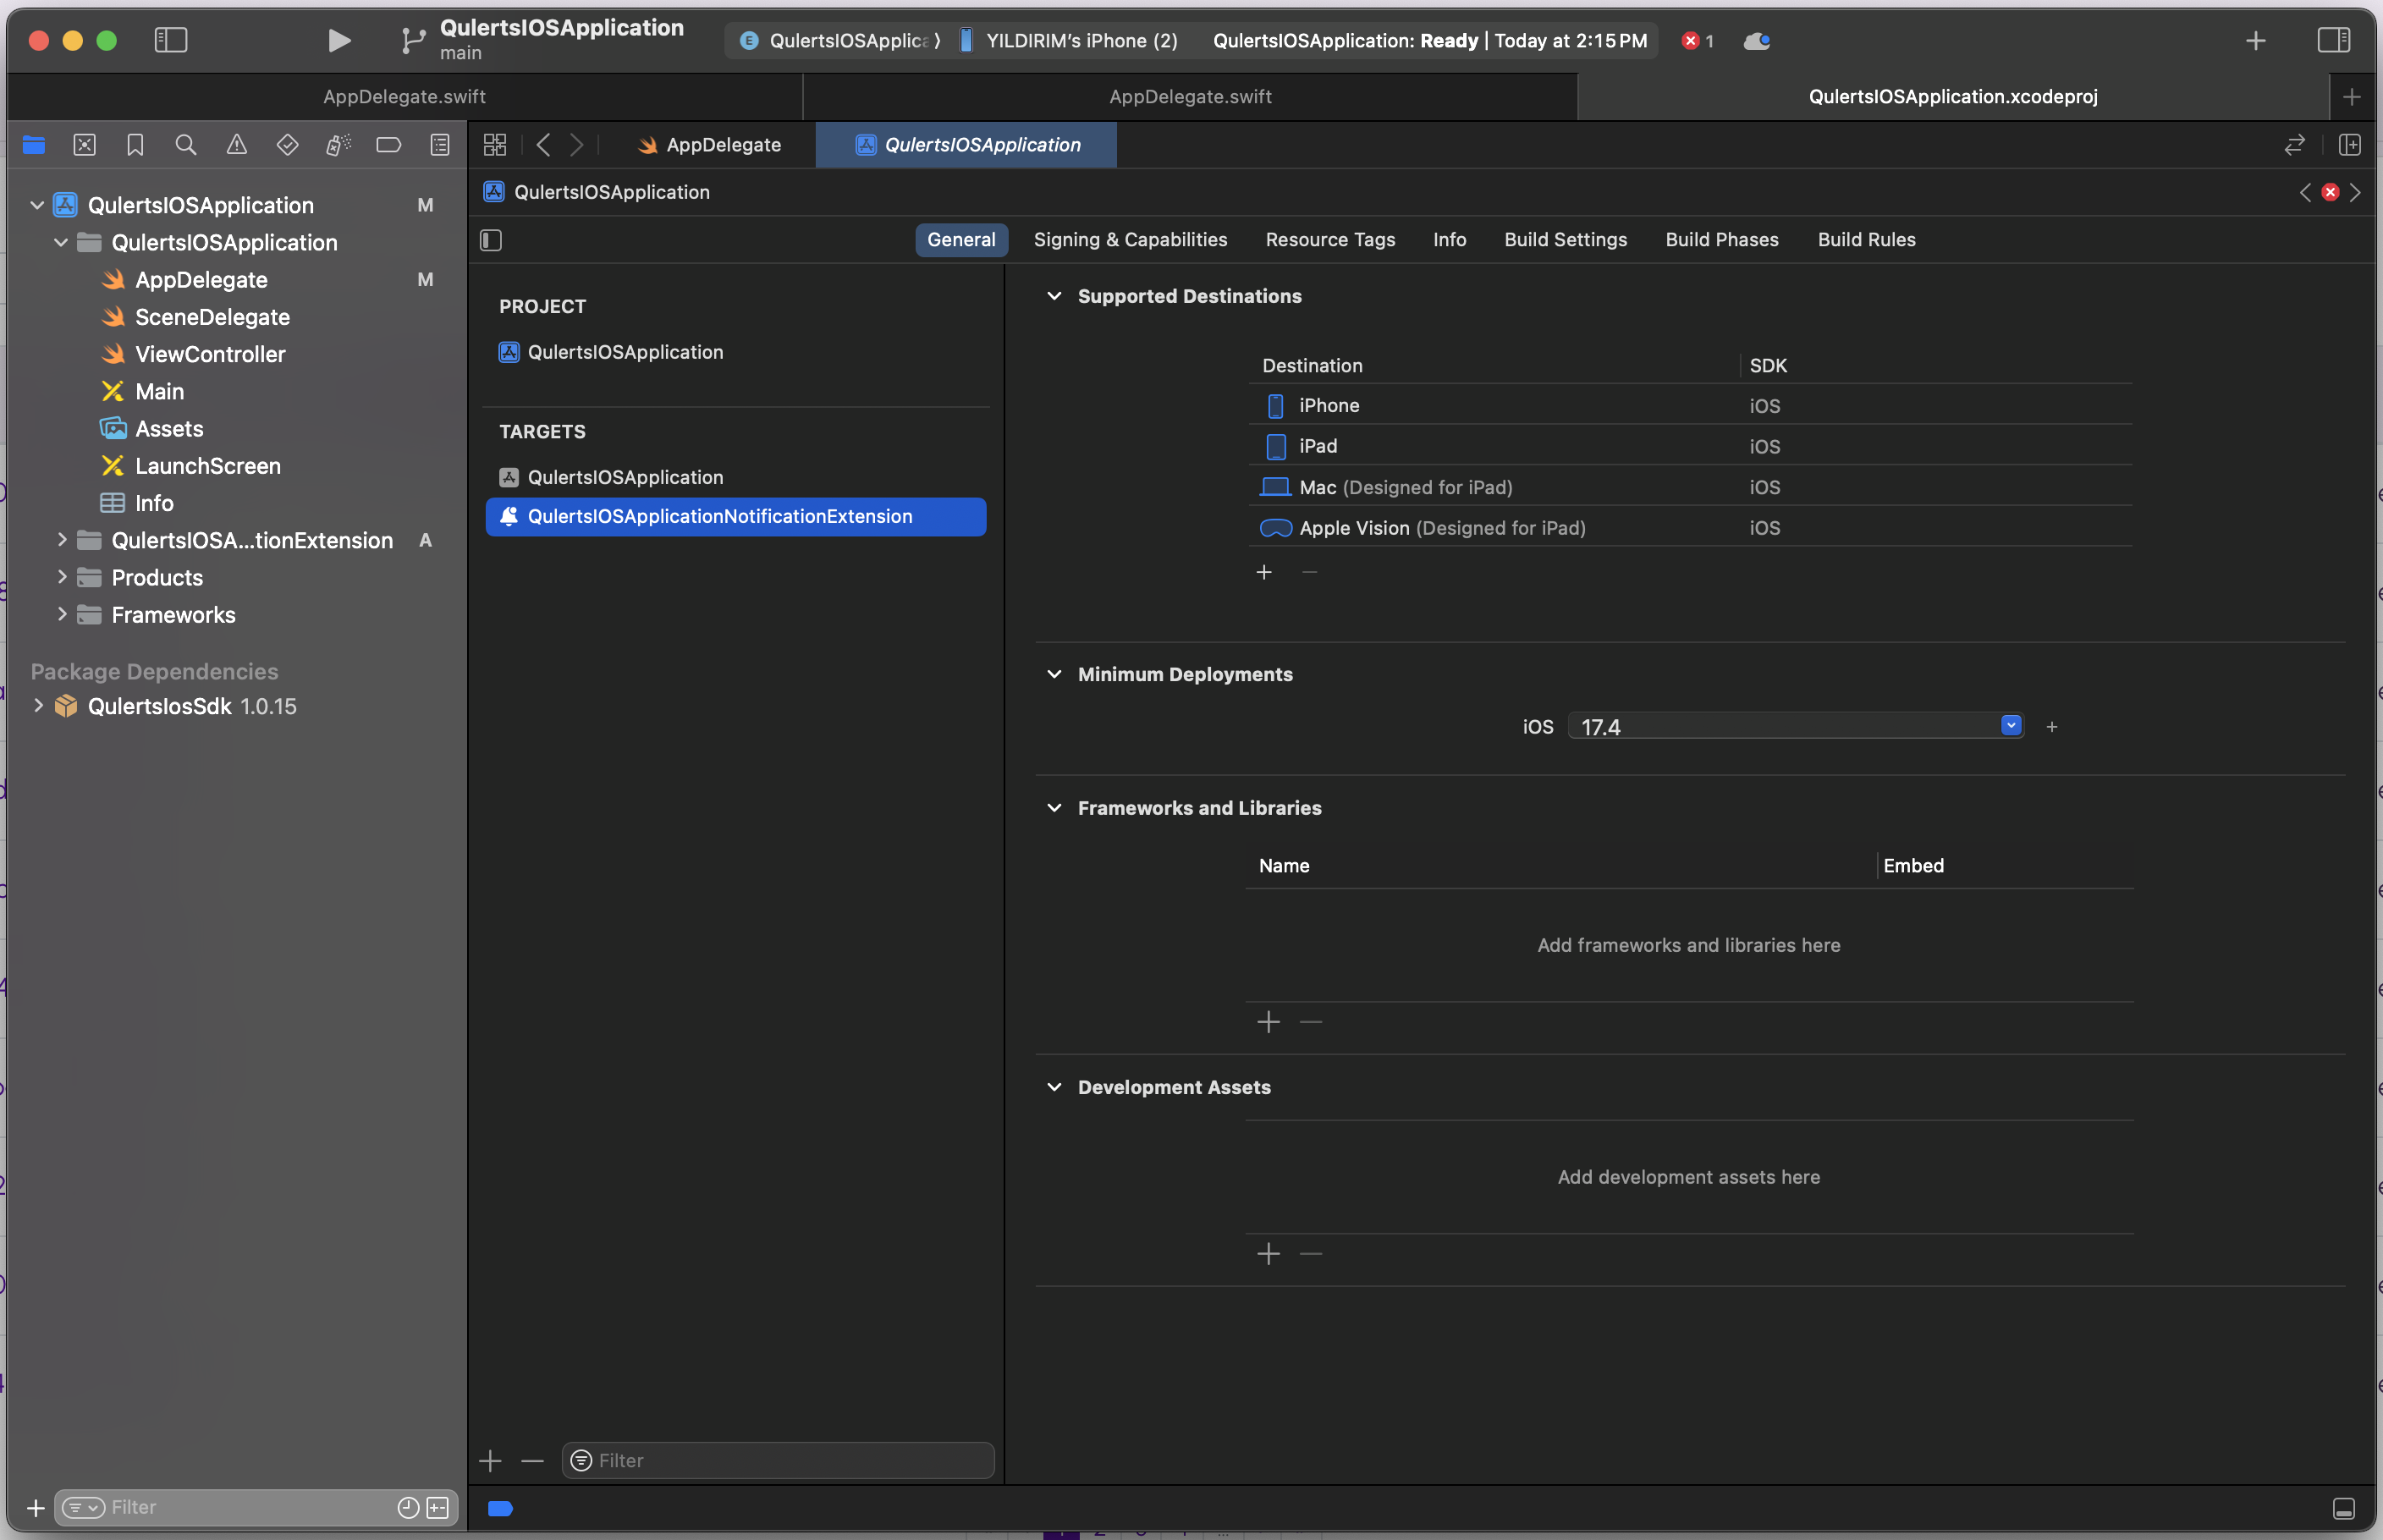
Extention must be listed under Targets
General Push Notification Extention added till here
Up to this point, you've added a general push notification extension to your mobile app. Next, you'll add the Qulerts package to handle push notifications.
Click + to Add Package Dependency
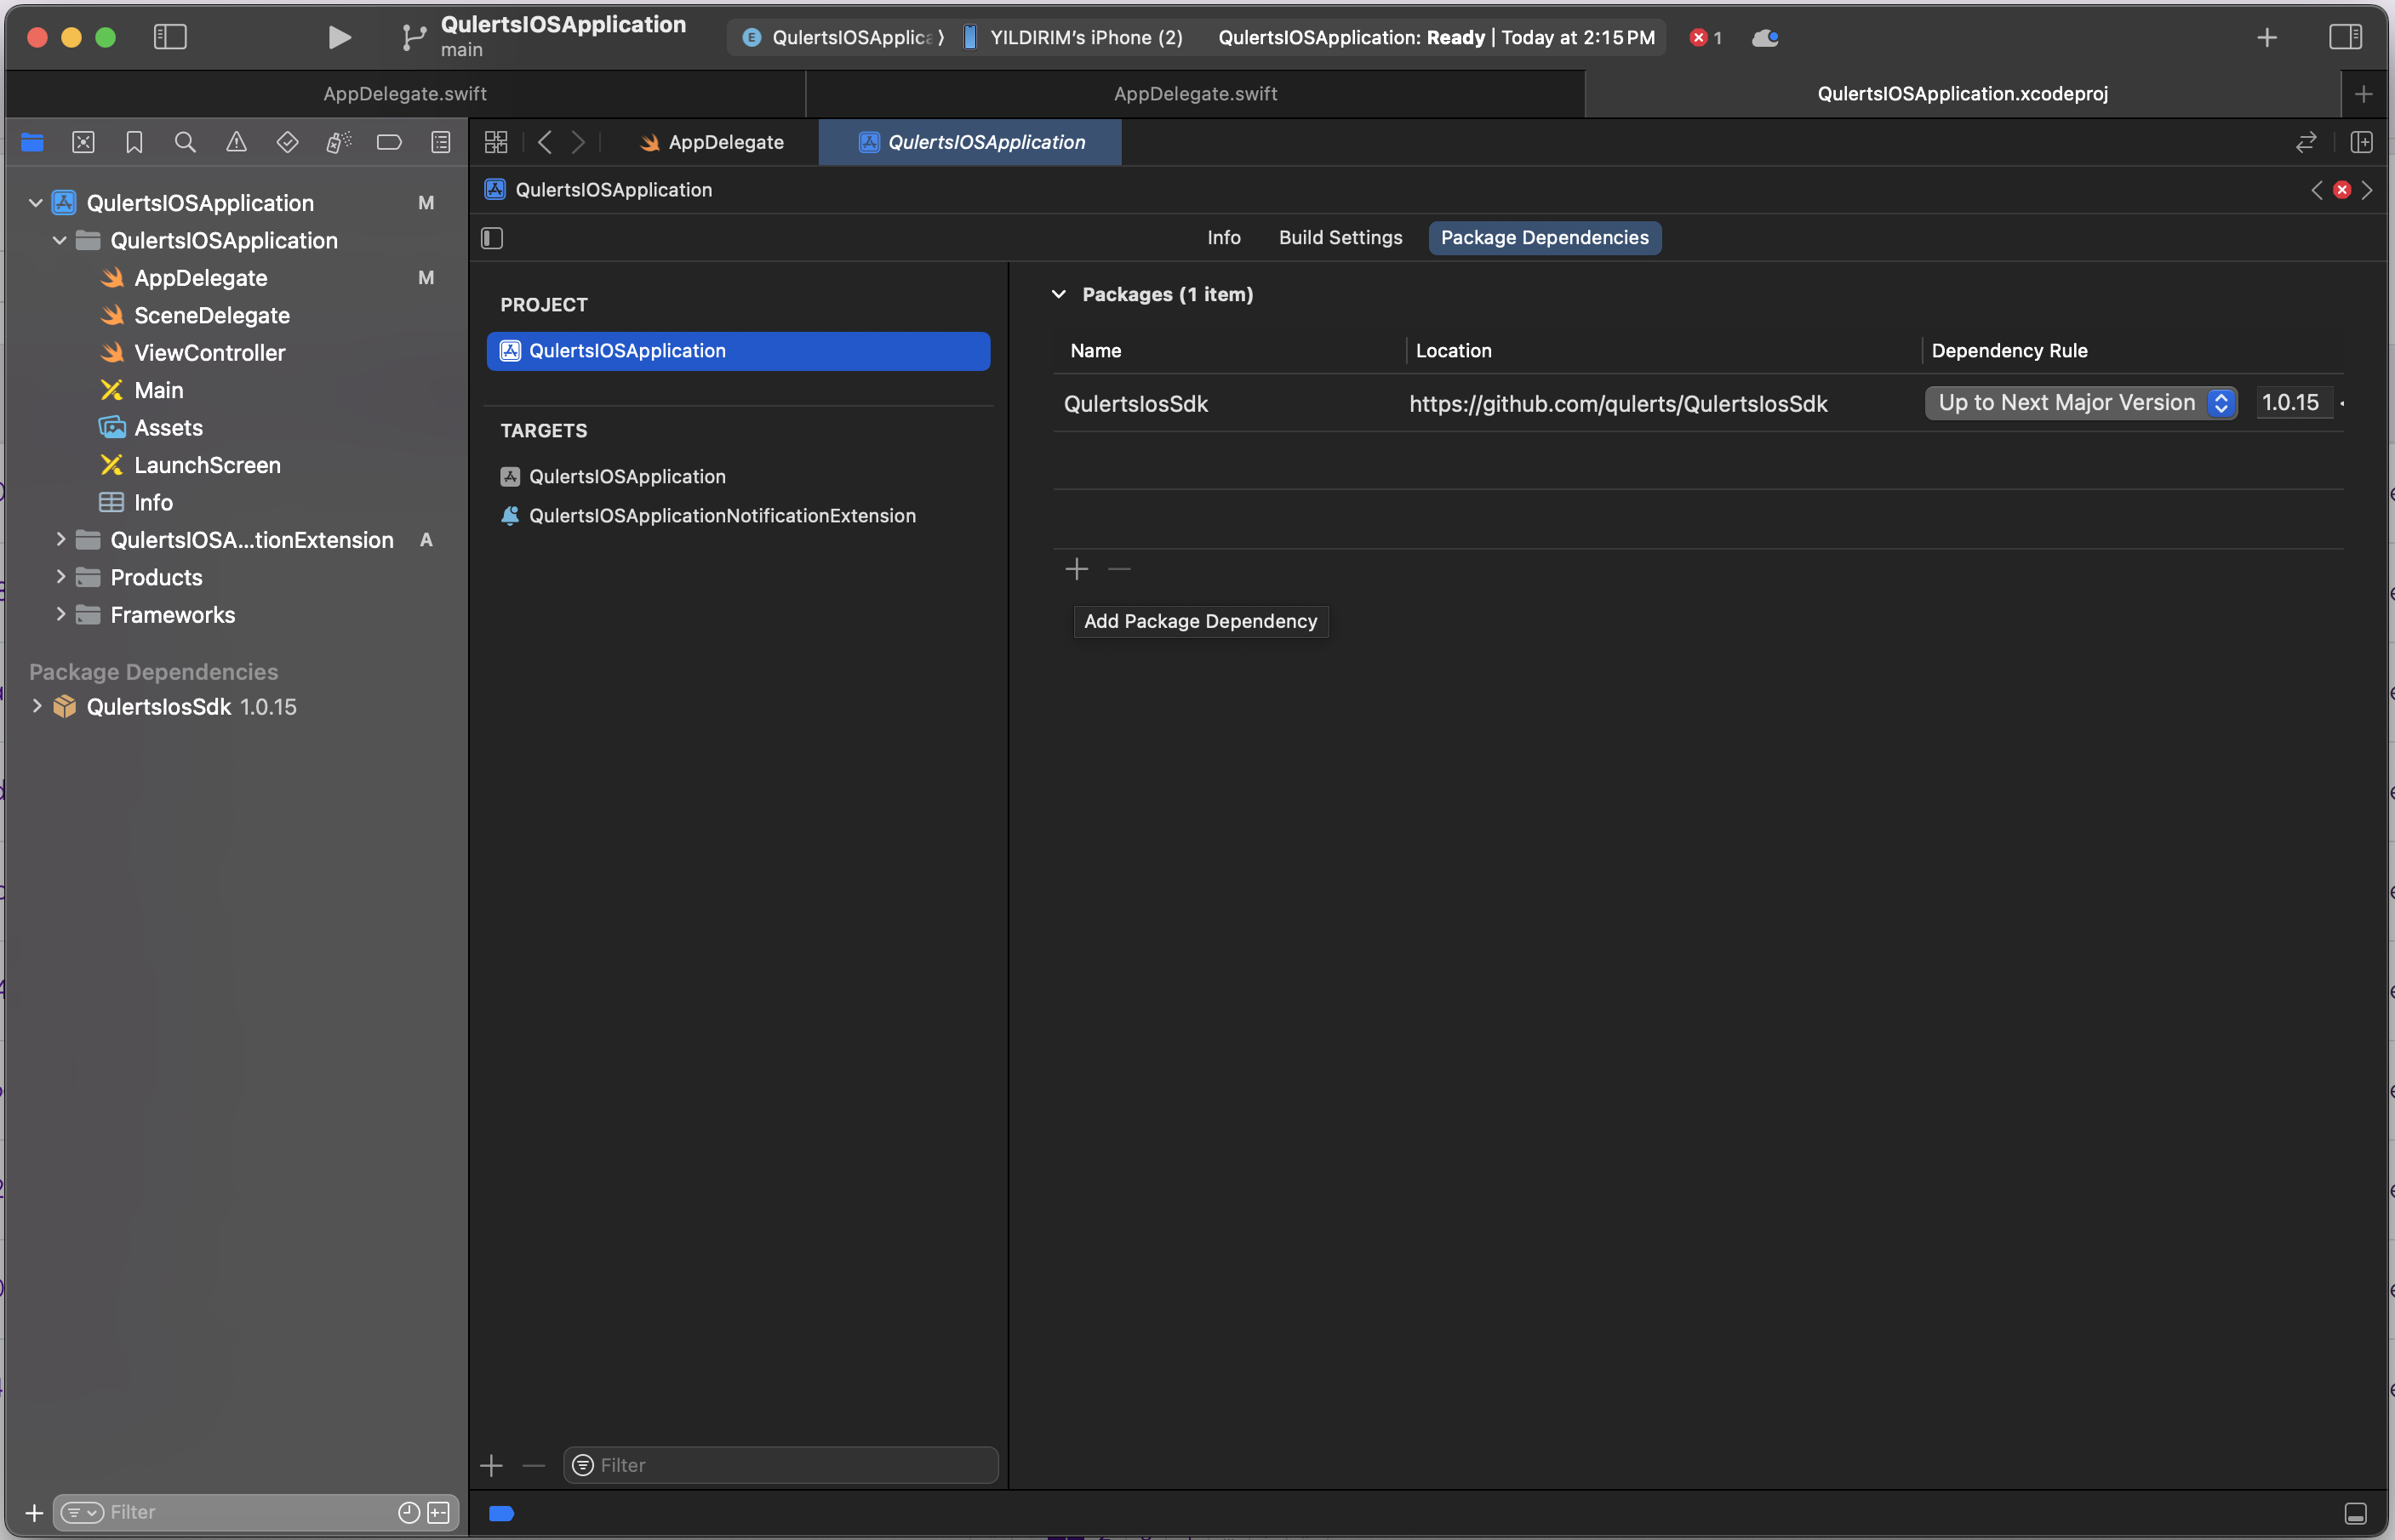
Add Package Dependecy to add Qulerts Notification Classes
In the "Choose Package Repository" window, paste the following URL: https://github.com/qulerts/QulertsNotificationExtension
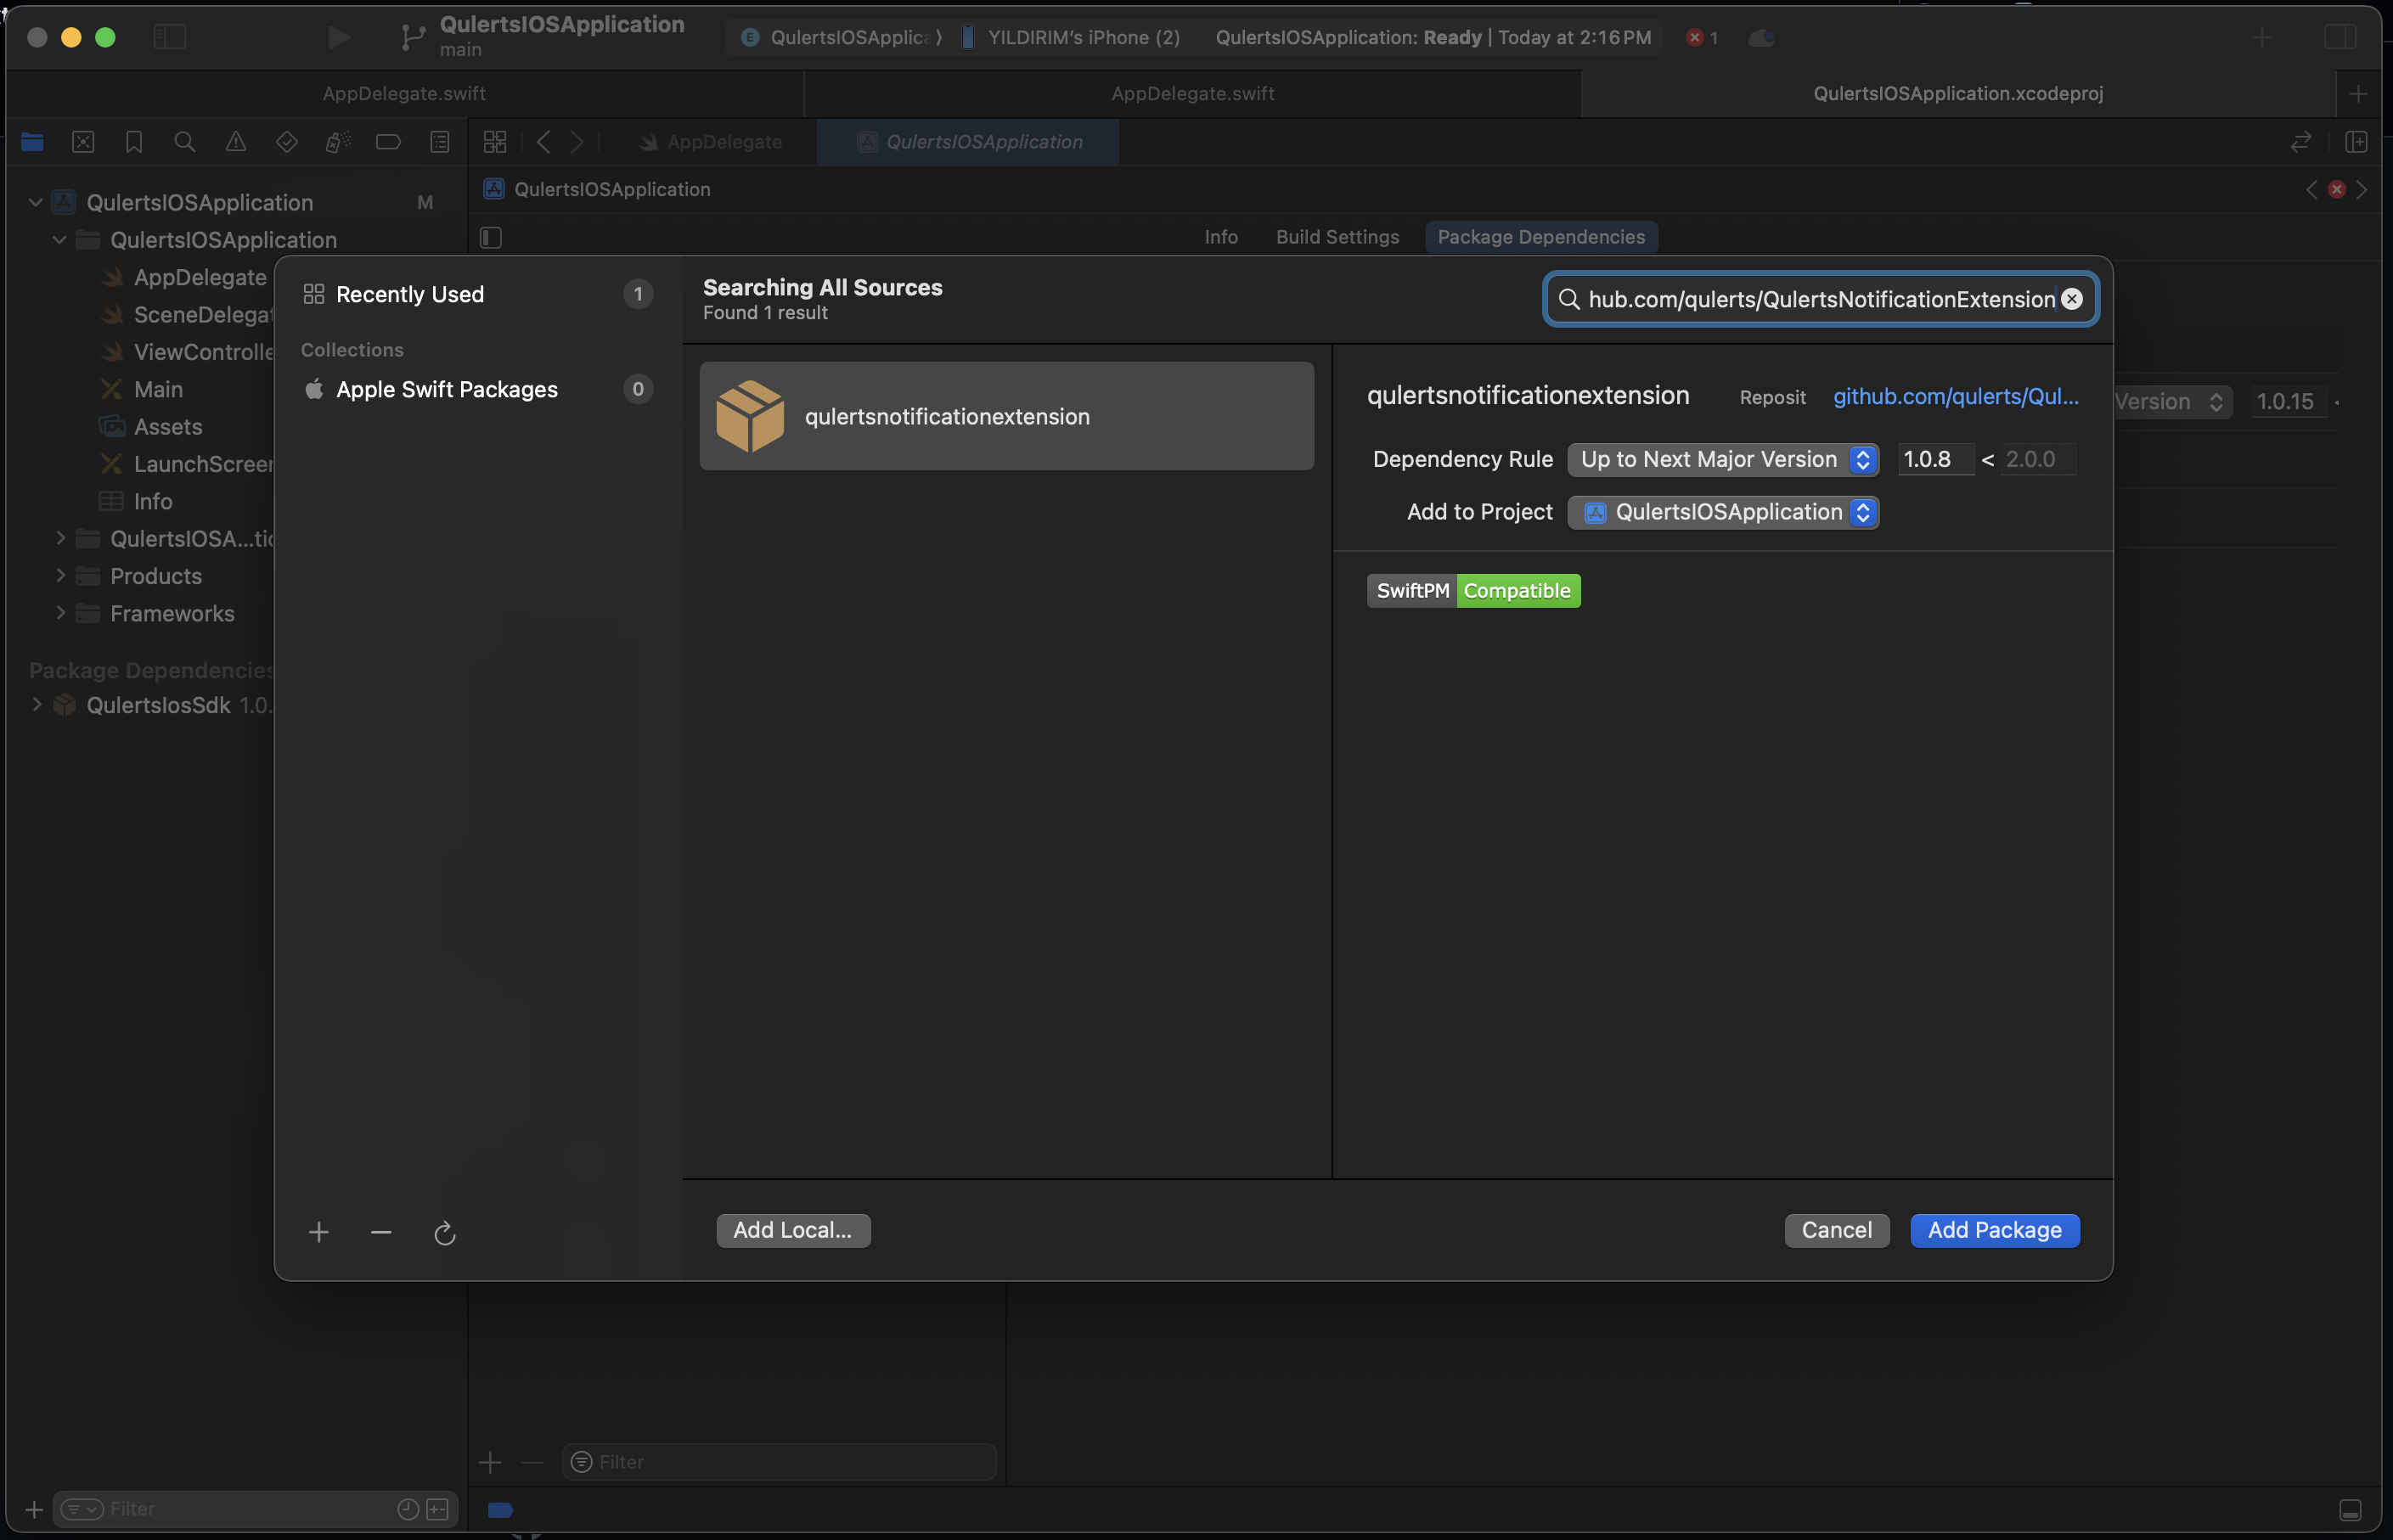
Choose Package Repository
Add QulertsNotificationExtention library with Add Package.
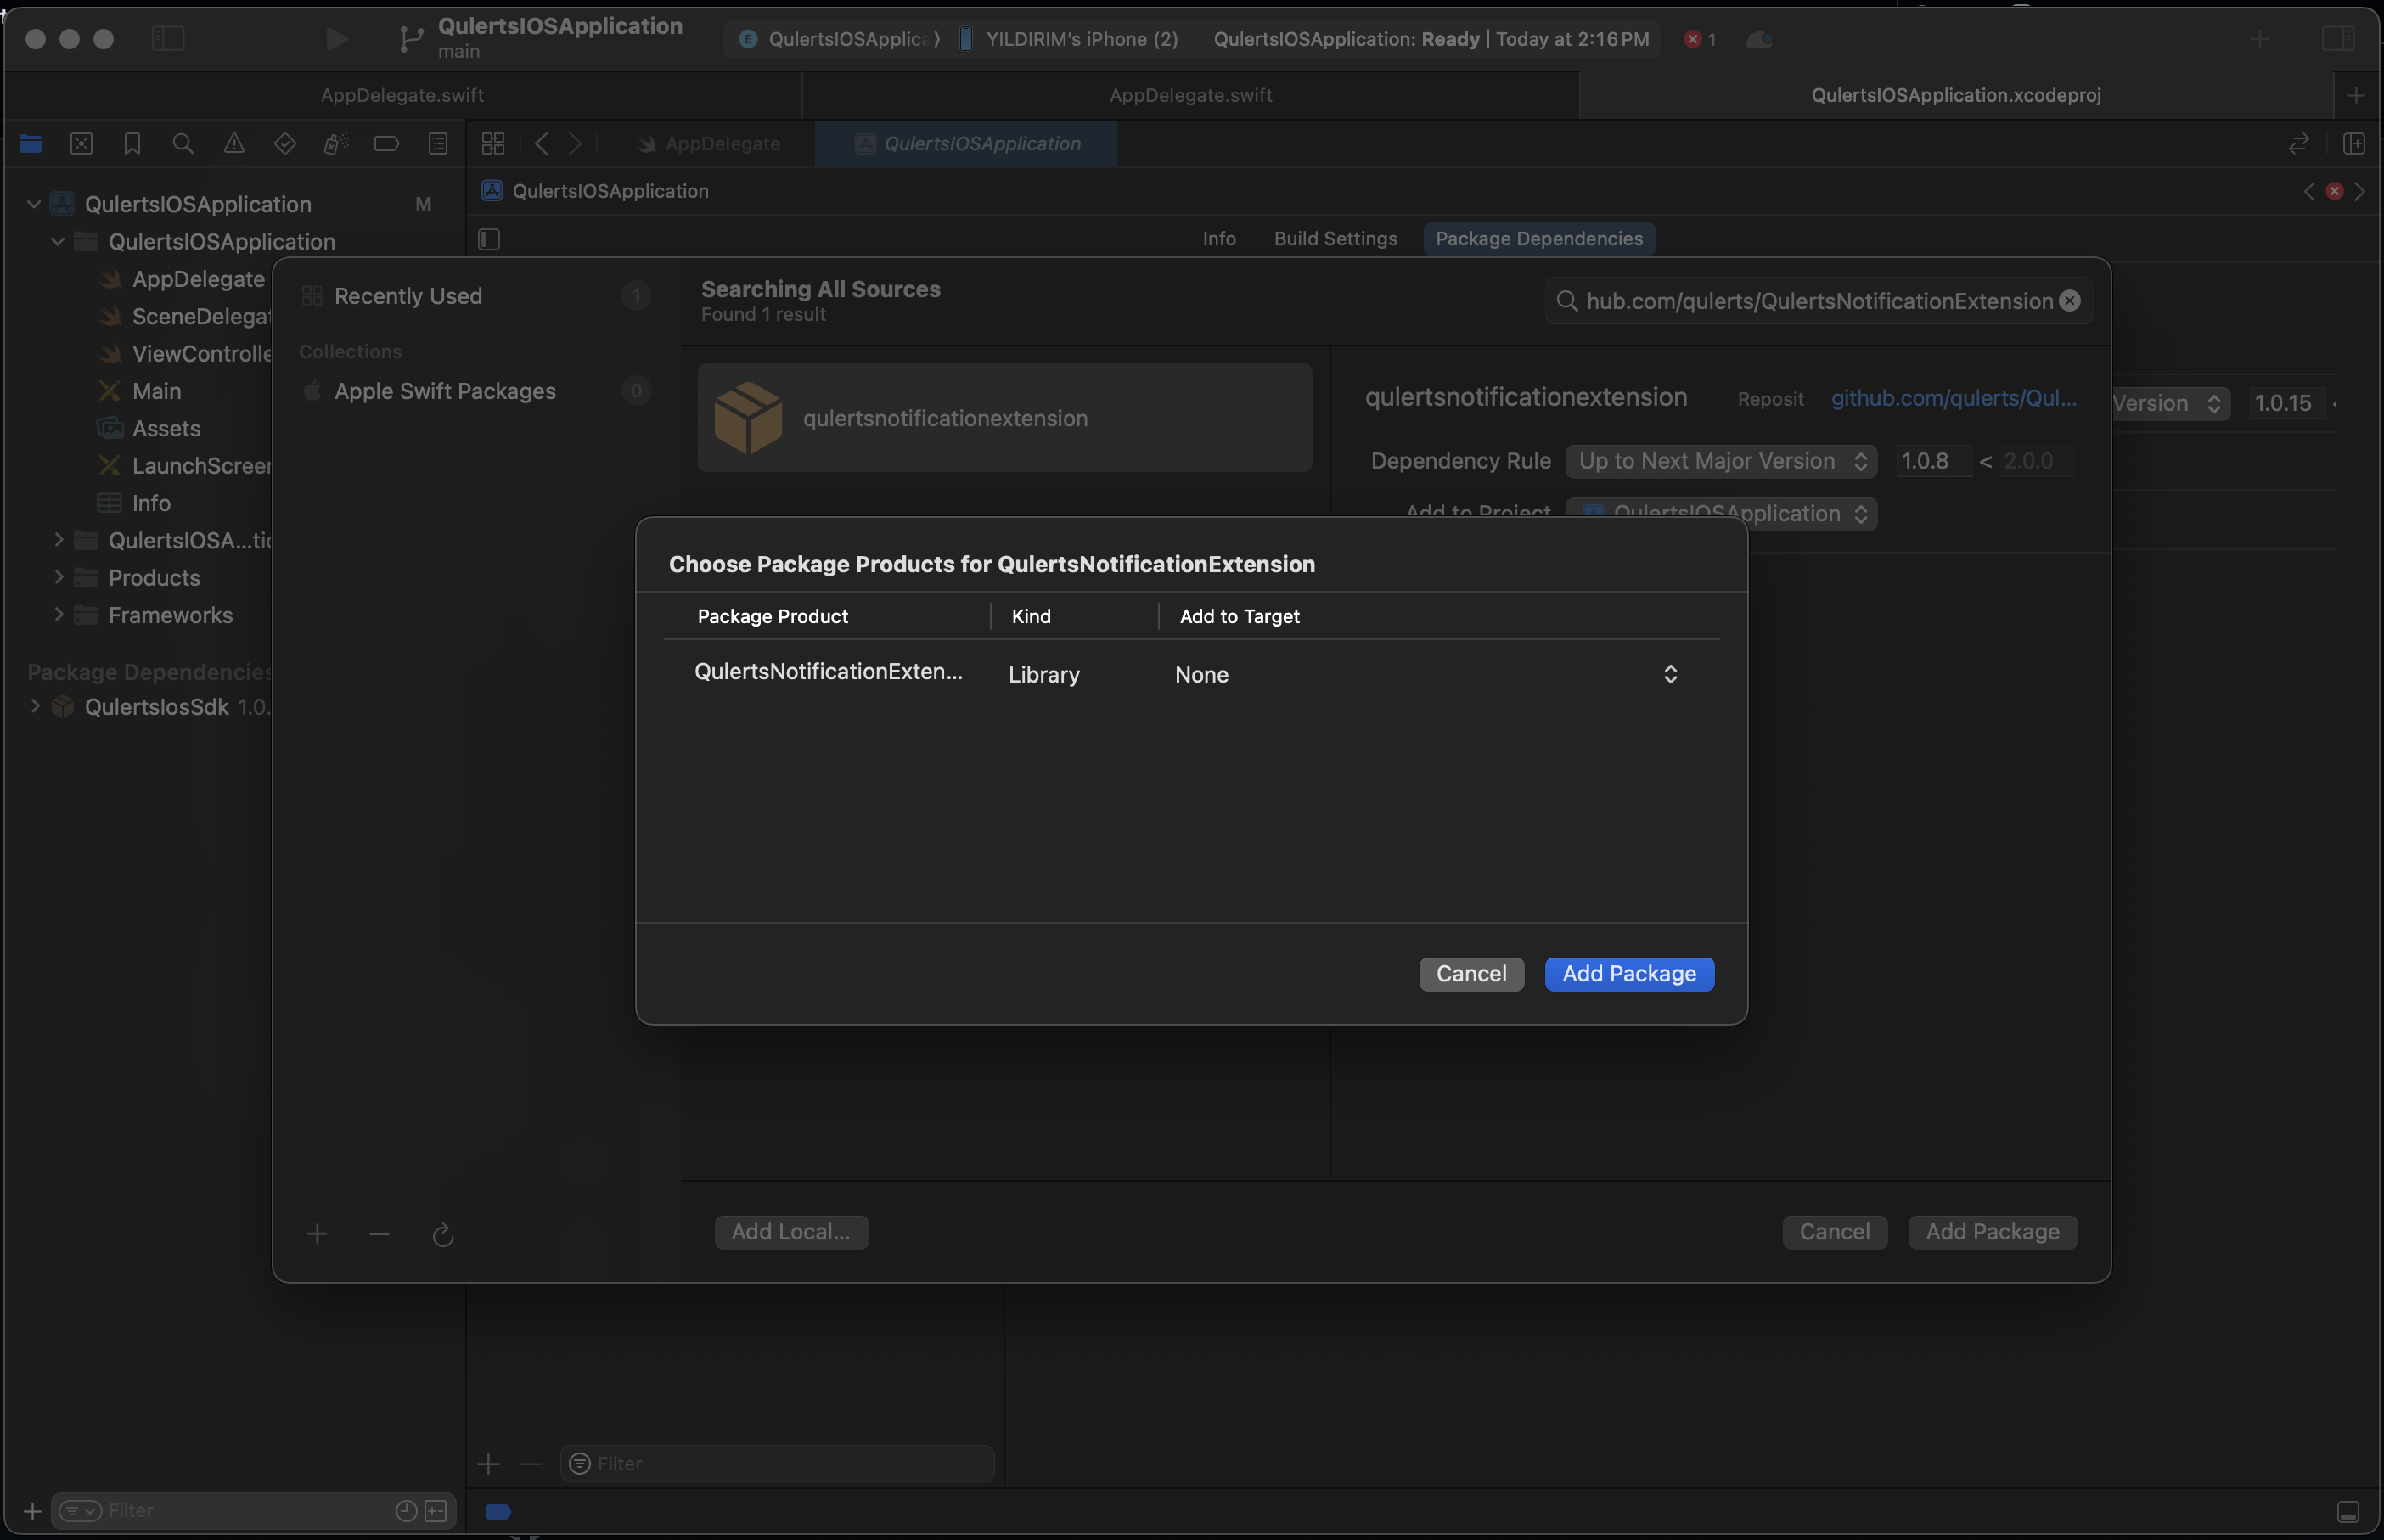
Select Qulerts library and add to the application
After adding both Qulerts IOS SDK and the Qulerts Notification Extension packages, you should see both listed under the Packages tab in your Xcode project settings. This indicates that both packages have been successfully added to your project and are available for use in your notification extension code.
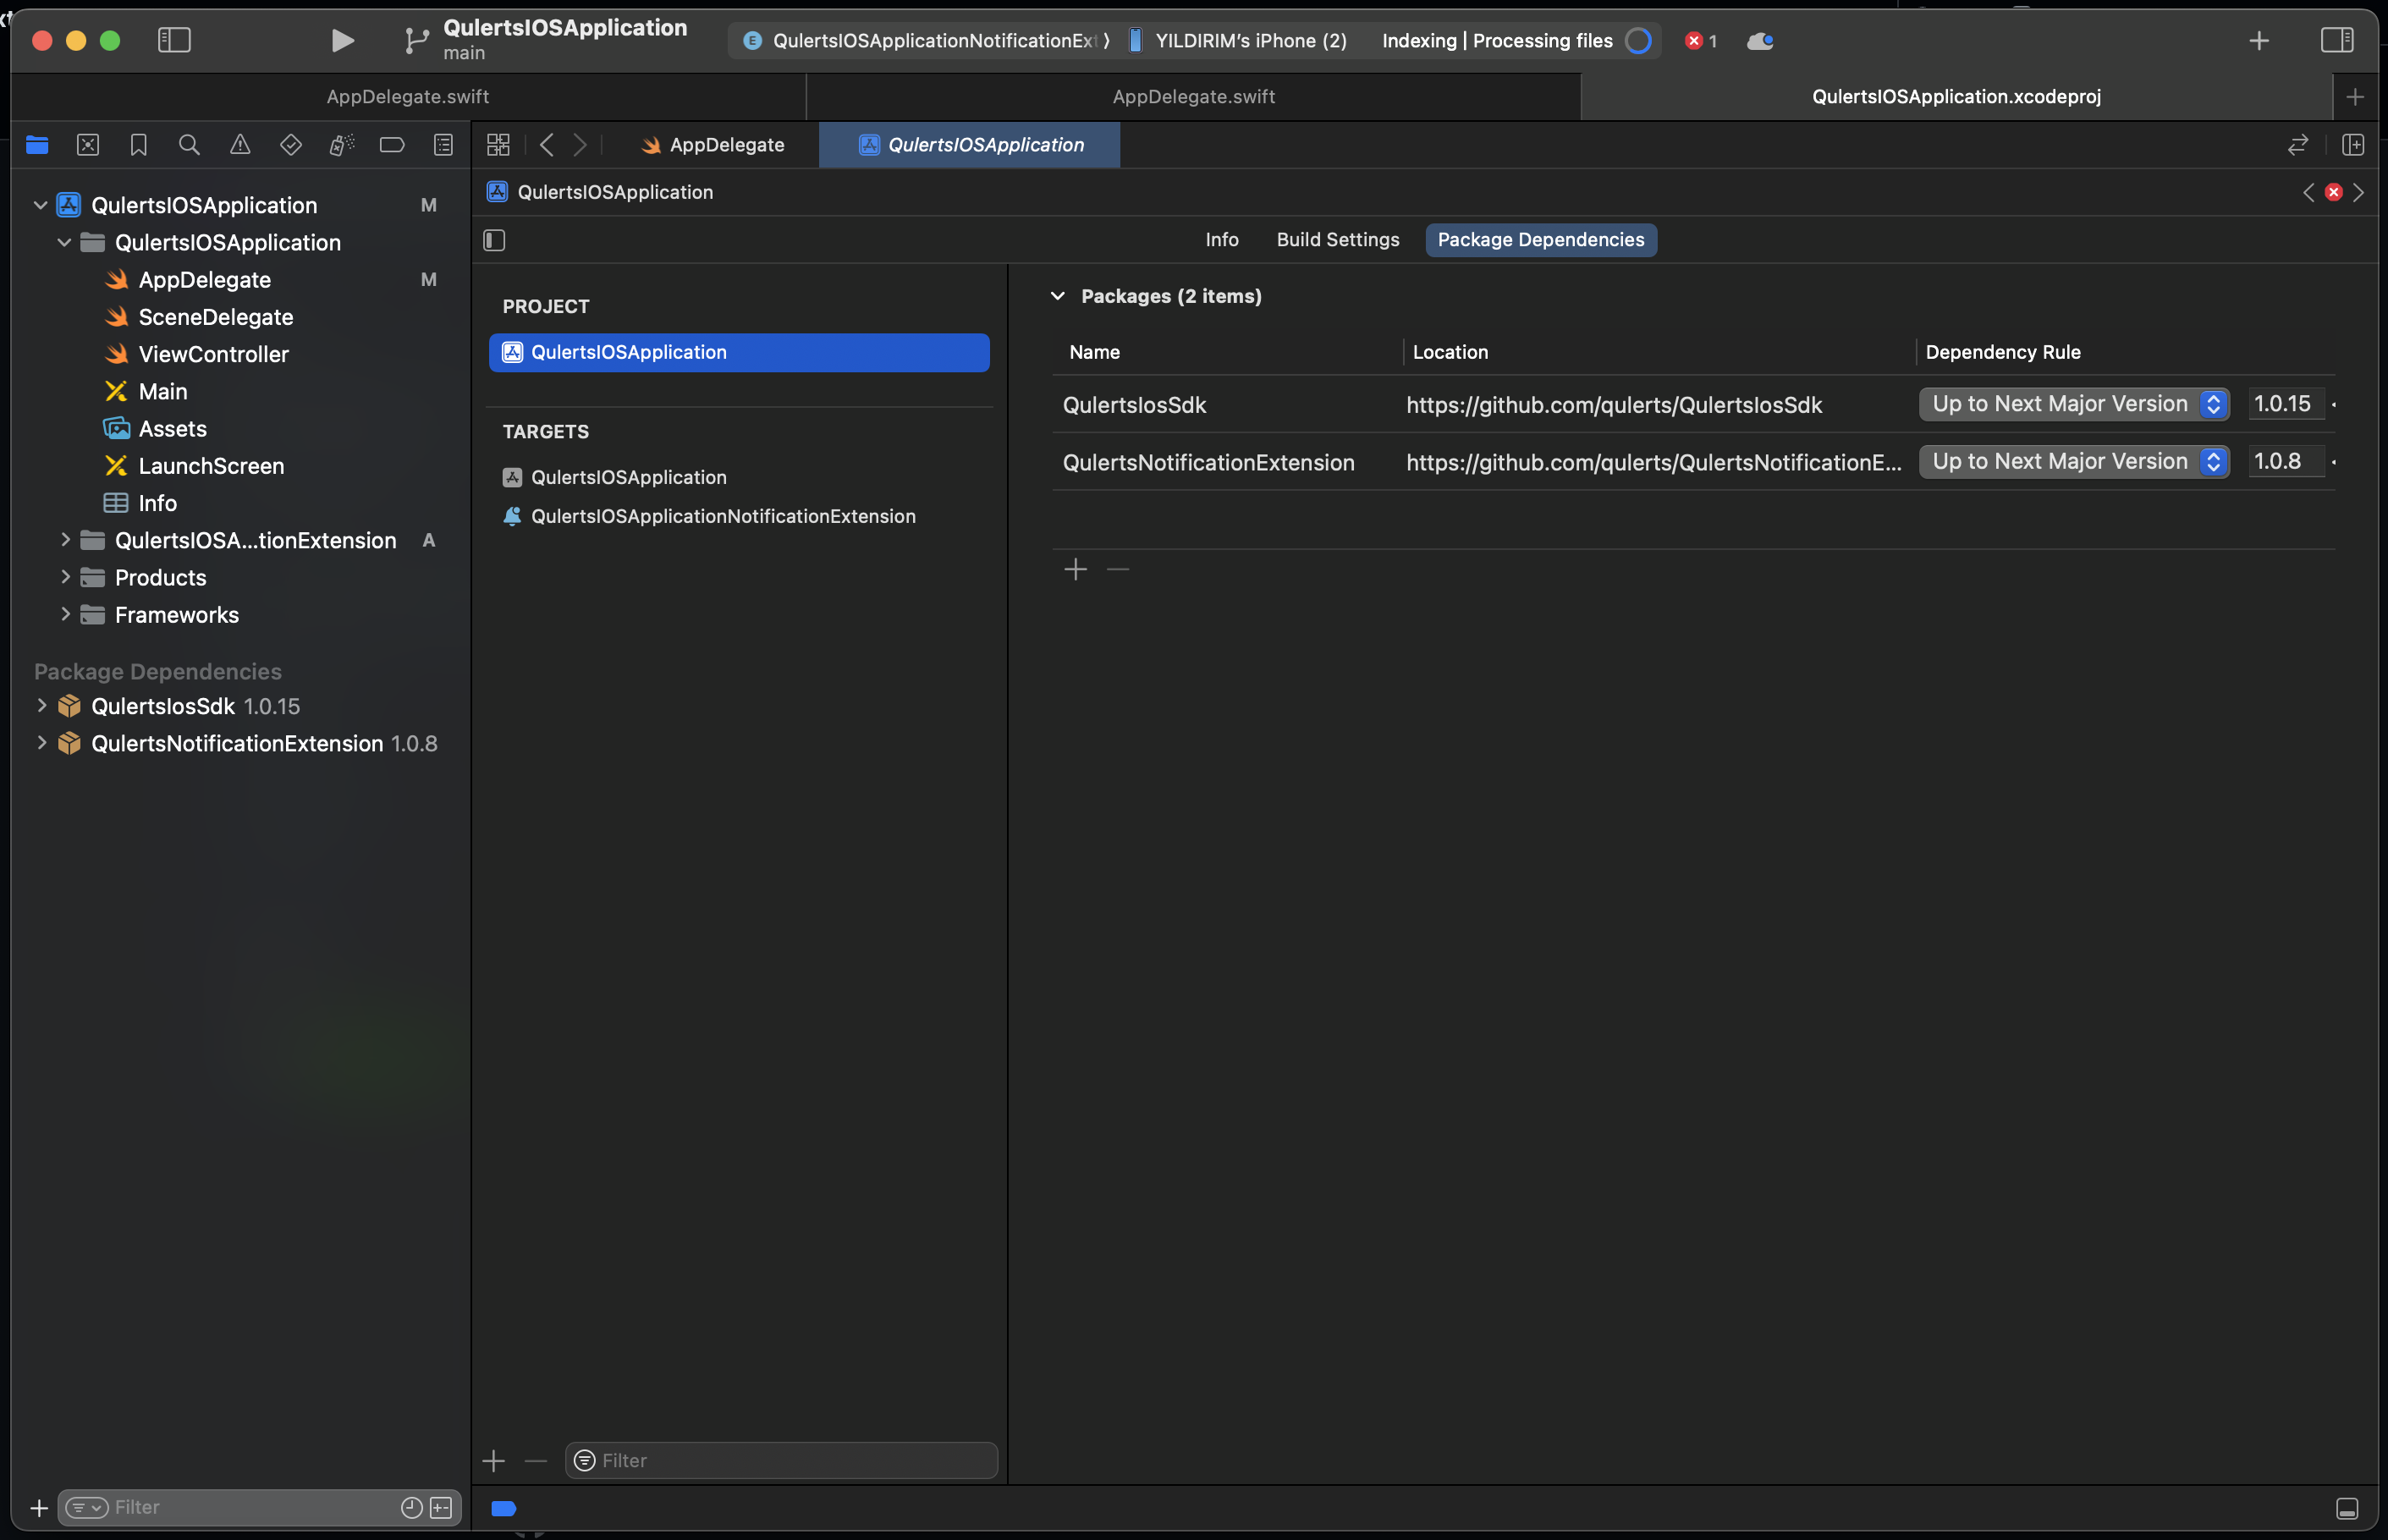
2 Qulerts packages under Packages tab
- Specify the package version: Choose the version of the Qulerts PushExtensionManager that you want to use. You can select "Up to Next Major Version" to get the latest major version, or specify a particular version if needed.
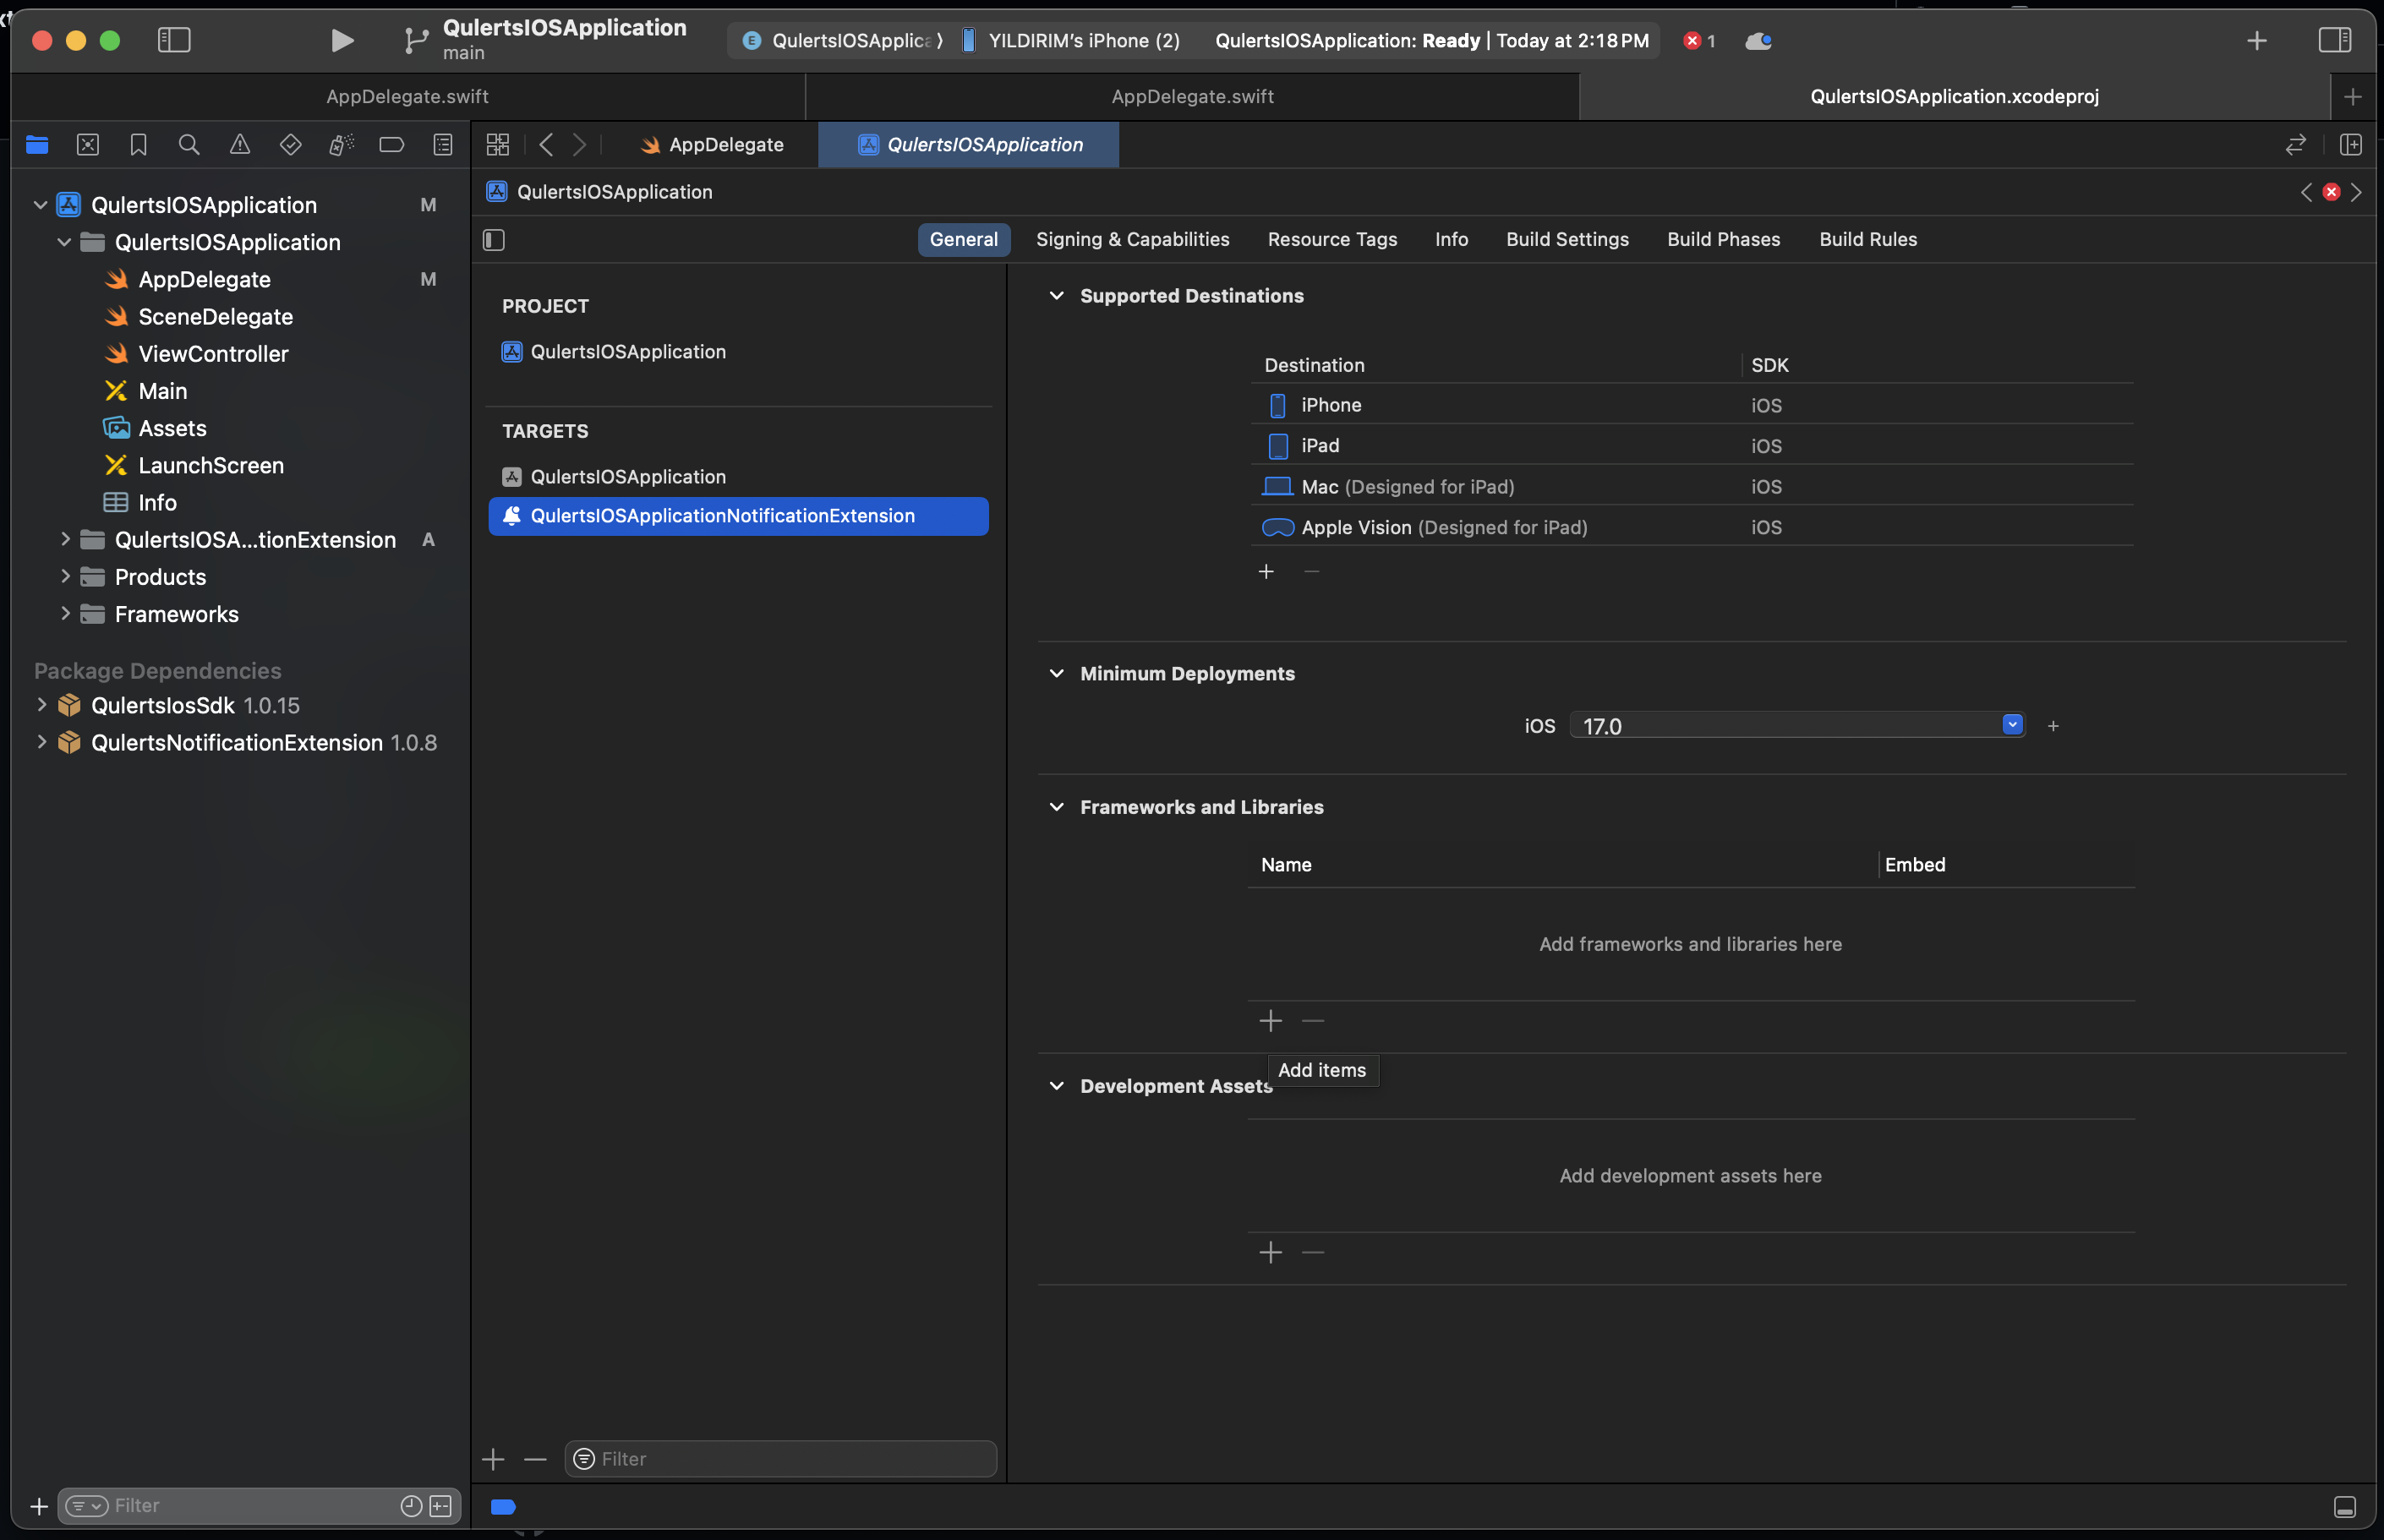
We are ready to use Push Messages in our application with Qulerts
Initialize IOS SDK
To initialize the Qulerts iOS SDK, you must add the initialization code to your AppDelegate.swift file or the main entry class of your application. Use the following method to initialize the SDK:
import UIKit
import QulertsIosSdk

@UIApplicationMain
class AppDelegate: UIResponder, UIApplicationDelegate {

    var window: UIWindow?

    func application(_ application: UIApplication, didFinishLaunchingWithOptions launchOptions: [UIApplication.LaunchOptionsKey: Any]?) -> Bool {
        // Override point for customization after application launch.

        // Initialize Qulerts SDK
        Qulerts.configure(sdkKey: "YOUR_APP_KEY", launchOptions: launchOptions)

        return true
    }

    // Other AppDelegate methods...
}
Replace YOUR_APP_KEY
Replace
"YOUR_APP_KEY"with your actual Qulerts app key, which you can obtain from your Qulerts account dashboard. This initialization should be done before using any other Qulerts SDK methods in your application.
Identify User and Make it Anonymous
To identify a user and make it anonymous using the Qulerts iOS SDK, you can use the login and logout methods. Here's how you can do it:
// Identify the user (e.g., with a member ID)
Qulerts.login(memberId: "External Key")

// Make the user anonymous (logout)
Qulerts.logout()
In the login method, you would replace "External Key" with the actual identifier for the user. This identifier should uniquely identify the user within your application. When you call logout, the user becomes anonymous again.
Calling login and logout functions
You can call the login or logout functions whenever you need to identify or make a user anonymous within your code. This flexibility allows you to manage user identification based on your application's requirements and user interactions.
Store Push token
To store your users' push notification tokens using the Qulerts iOS SDK, you can add the following code to the didRegisterForRemoteNotificationsWithDeviceToken method in your AppDelegate.swift file:
func application(_ application: UIApplication, didRegisterForRemoteNotificationsWithDeviceToken deviceToken: Data) {
    Qulerts.savePushToken(deviceToken: deviceToken)
}
This code will save the device token to the Qulerts SDK, allowing you to send push notifications to the device.
Token Store
It's crucial to call the savePushToken function within the didRegisterForRemoteNotificationsWithDeviceToken method in your AppDelegate.swift file. This ensures that the device token is properly saved when the user grants permission for push notifications.
Tagging a Subscriber
Tagging a user refers to associating specific attributes or characteristics with that user in your system. These tags can be used for various purposes, such as:
-
Personalization: Tags can be used to personalize the user experience based on their interests, behavior, or demographics. For example, you might tag a user as "sports fan" if they frequently read sports-related content in your app.
-
Targeting: Tags can be used to target specific groups of users for marketing or messaging campaigns. For example, you might tag users who have made a purchase as "customers" to target them with special offers.
-
Segmentation: Tags can be used to segment your user base into different groups for analysis or targeting. For example, you might tag users based on their location to analyze regional trends or target them with location-specific promotions.
-
Behavioral Triggers: Tags can be used to trigger certain actions or messages based on user behavior. For example, you might tag a user as "inactive" if they haven't logged in for a certain period, triggering a re-engagement campaign.
Overall, tagging users allows you to better understand and engage with your user base, leading to a more personalized and targeted user experience.
You can add tags anywhere in your code. When any tag event is called, it overrides the existing data.
// add this subscriber to Vip tag. A tag without a value
Qulerts.tag(key: "vip")
// add date tag to a user
Qulerts.tagDate(key: "registerDate", value: Date())
// add array tag to a user
Qulerts.tagArray(key: "segments", value: ["firstMove", "technology"])
// add double type tag to a user
Qulerts.tagDouble(key: "price", value: 240.2)
// add city tag to a user
Qulerts.tagString(key: "city", value: "Irvine")
// add star tag to a user
Qulerts.tagBoolean(key: "star", value: true)
// add integer tag to a user
Qulerts.tagInteger(key: "age", value: 45)
These functions allow you to add different types of tags to a user's profile, such as strings, integers, arrays, dates, booleans, and doubles.
Remove Tag
The removeTag function is used to remove a tag from a subscriber's profile. Here's an example of how to use it:
// This function removes the "vip" tag from the subscriber
Qulerts.removeTag(key: "vip")
This function is useful when you no longer need a particular tag associated with a subscriber and want to remove it from their profile.
Enable mobile push notifications
In your notification service extension's didReceive(_:withContentHandler:) method, you can add Qulerts-related code to handle the notification request. Here's an example of how you can integrate Qulerts into your notification service extension:
override func didReceive(_ request: UNNotificationRequest, withContentHandler contentHandler: @escaping (UNNotificationContent) -> Void) {
    self.contentHandler = contentHandler
    bestAttemptContent = (request.content.mutableCopy() as? UNMutableNotificationContent)

    // Call QulertsNotification's didReceiveNotificationRequest method
    QulertsNotification.didReceiveNotificationRequest(request: request, bestAttemptContent: bestAttemptContent, withContentHandler: contentHandler)
}
This code snippet demonstrates how you can use QulertsNotification's didReceiveNotificationRequest method to process the incoming notification request and update the content of the notification if necessary. Make sure to import the QulertsNotification framework in your notification service extension file.
Now you are ready to receive push notifications
Great job!
Your application is now set up to receive push notifications using QulertsNotification's
didReceiveNotificationRequestfunction. This function not only handles the reception of mobile push messages but also manages the sending of Confirmed Delivery and reports, such as clicks, back to the Qulerts platform automatically. This integration will help you effectively manage and analyze the impact of your push notification campaigns.
Updated 7 months ago
